
User Guide
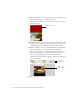


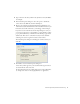
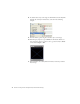
Table Of Contents
- Contents
- Introduction
- Flash Lite Overview
- Hello World Flash Lite application (Flash Professional only)
- Flash Lite authoring features in Flash Professional 8 (Flash Professional only)
- Workflow for authoring Flash Lite applications (Flash Professional only)
- About Flash Lite content types
- Creating a Flash Lite document template (Flash Professional only)
- Tutorial: Creating a Flash Lite Application (Flash Professional Only)
- Cafe application overview (Flash Professional only)
- View the completed application (Flash Professional only)
- Create the application (Flash Professional only)
- Index
Create the application (Flash Professional only) 31
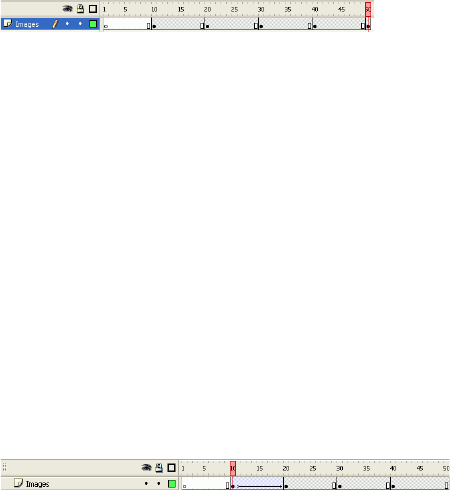
5. In the Images layer, insert keyframes in Frames 20, 30, 40, and 50, as
the following image shows:
6. In the Timeline, select the keyframe in Frame 20.
7. On the Stage, select the Images movie clip, and set its y coordinate to
-100 in the Property inspector.
This moves the movie clip upward on the Stage 100 pixels.
8. Select the keyframe in Frame 30 in the Timeline, select the images
movie clip, and set its y coordinate to -200 in the Property inspector.
9. Select the keyframe in Frame 40, select the images movie clip, and set
its y coordinate to -300 in the Property inspector.
10. Select the keyframe in Frame 50, select the images movie clip, and set
its y coordinate to -400 in the Property inspector.
11. Select the keyframe in Frame 10, and select Motion from the Tween
pop-up menu in the Property inspector.
This tweens the Images movie clip’s position between the keyframes in
Frames 10 and 20.
12. To create transitions between the other images, repeat step 11 for the
keyframes located in Frames 20, 30, and 40.
13. To create the mask layer, select the Images layer in the Timeline, and
then select Insert > Timeline > Layer (or click Insert Layer in the
Timeline).
14. Insert a keyframe in Frame 10 of the new mask layer.