
User Guide
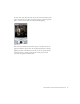

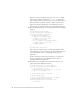
Table Of Contents
- Contents
- Introduction
- Flash Lite Overview
- Hello World Flash Lite application (Flash Professional only)
- Flash Lite authoring features in Flash Professional 8 (Flash Professional only)
- Workflow for authoring Flash Lite applications (Flash Professional only)
- About Flash Lite content types
- Creating a Flash Lite document template (Flash Professional only)
- Tutorial: Creating a Flash Lite Application (Flash Professional Only)
- Cafe application overview (Flash Professional only)
- View the completed application (Flash Professional only)
- Create the application (Flash Professional only)
- Index
30 Tutorial: Creating a Flash Lite Application (Flash Professional Only)
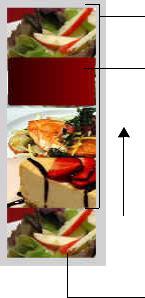
To create the animation, you’ll use a prebuilt movie clip that contains
images of all of the specials arranged in a vertical column. You’ll use a
masking layer to make only one of the images visible. Then you’ll create a
series of tweens that move the movie clip upward, so that a different image
is visible. The last image in the movie clip is a duplicate of the first one, so
that the animation sequence can return to its initial state after the user
views the final image. These concepts are illustrated in the following
example:
In the last section of the tutorial, you’ll add ActionScript and user interface
elements that let the user control the animation sequence.
1. Open the file you saved in “Create the menu for the home screen (Flash
Professional only)” on page 25.
2. In the Timeline, select the keyframe in Frame 10 in the layer named
Images.
3. Open the Library panel, and drag the symbol named Specials movie clip
to the Stage.
The rest of this tutorial refers to this movie clip simply as the Images
movie clip.
4. With the new movie clip instance selected, set the movie clip’s x and y
coordinates both to 0 in the Property inspector.
This aligns the upper-left corner of the images movie clip with the
upper-left corner of the Stage.
Masking layer object
Masked movie clip of images
Tween direction
Duplicated image