
Specifications


Adding animation to a timeline 53
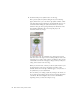
Scene 1 refers to the main timeline of the FLA file. You can click this
button on the edit bar to return to the main timeline. The names after
it point to the symbol that you're editing. If the symbol is nested
within other symbols, this path might contain several names. In the
previous figure, you can see that you're editing the join us symbol that's
on the main timeline (Scene 1).
4. Select the PNG file that's inside the movie clip, and then press F8 to
convert it into another symbol.
5. In the Convert to Symbol dialog box, type the name nested mc in the
Name text box, select Movie clip, and click OK.
6. Select Frame 15 and select Insert > Timeline > Keyframe.
This command inserts a new keyframe, which means you can modify
the content on that frame to create animation. Currently, the content
on Frame 15 is duplicated from the content on Frame 1. When you
modify Frame 15 in a future step, the modifications won't change the
content on Frame 1.
7. Select Frame 30 and press F6 to insert a new keyframe.
The keyframe duplicates the content from Frame 15. That means the
content on all three frames is the same.
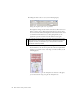
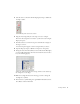
8. Select the movie clip instance on Frame 15, and open the Property
inspector (Window > Properties > Properties).
9. Select Brightness from the Color pop-up menu (the following figure).
NOTE
Press F6 to quickly insert a new keyframe.
NOTE
Make sure you select the instance on Frame 15, not just the frame. You
can first select the frame on the Timeline (or move the playhead to Frame
15), and then select the movie clip instance on the Stage in order to see
the correct context of the Property inspector, as shown in the following
figure.