
User Guide


Customizing the FLVPlayback component 535
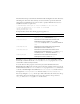
Button states
All the button states are laid out on the Stage, but where these movie clip instances are placed
on the Stage is not important. It is important, however, that they are nested within movie
clips in a specific way and that every clip instance has the correct instance name.
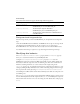
The structure of the clip instances and their instance names are shown in the following
example:
playpause_mc
play_mc
up_mc, over_mc, down_mc, disabled_mc
pause_mc
up_mc, over_mc, down_mc, disabled_mc
stop_mc
up_mc, over_mc, down_mc, disabled_mc
back_mc
up_mc, over_mc, down_mc, disabled_mc
forward_mc
up_mc, over_mc, down_mc, disabled_mc
volumeMute_mc
on_mc
up_mc, over_mc, down_mc, disabled_mc
off_mc
up_mc, over_mc, down_mc, disabled_mc
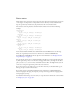
Notice that the Flash 8 FLA files have additional Forward and Back buttons on the Stage.
These are on guide layers and are there to show the use of the ForwardBackBorder,
ForwardBorder, and BackBorder movie clips. For more information, see “Background and
foreground clips” on page 538.
You can edit the various states as desired. Remember that all states are placed in the same place
by their registration points, so if some states are bigger than others, you might not be able to
place your art at (0, 0) as it is in most of the Flash 8 button skins. You might find it easier, in
some cases, to keep the registration point in the center of the art.
If you do not want to use all the states, you can omit some, but you should include up_mc.
The up_mc clip is used for omitted states.
If you want to have separate Play and Pause buttons, rather than a combined Play-Pause
button, simply place the play_mc and pause_mc clips on the Stage without wrapping them
with a playpause_mc clip.
No additional ActionScript code is necessary to set up the buttons besides the code described
in “Using layout_mc” on page 532.