
User Guide


Using the FLVPlayback component 509
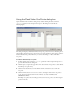
6. Select one of the following options:
■ From the drop-down Skin list, select one of the predesigned skins to attach a set of
playback controls to the component.
■ If you created a custom skin for the component, select Custom Skin URL from the
pop-up menu, and enter the URL for the SWF file that contains the skin in the URL
text box.
■ Select None, and drag individual FLV Playback Custom UI components to the Stage
to add playback controls.
7. Click OK to close the Select Skin dialog box.
8. Read the Finish Video Import dialog box to note what happens next, and then click Finish.
9. If you have not saved your FLA file, a Save As dialog box appears.
10. Select Test Movie from the Control menu to execute the SWF file, and start the video.
To create an instance dynamically using ActionScript:
1. Drag the FLVPlayback component from the Components panel to the Library (Window >
Library).
2. Add the following code to the Actions panel on Frame 1 of the Timeline. Change
install_drive to the drive on which you installed Flash 8 and modify the path to reflect
the location of the Skins folder for your installation:
import mx.video.*;
this.attachMovie("FLVPlayback", "my_FLVPlybk", 10, {width:320,
height:240, x:100, y:100});
my_FLVPlybk.skin = "file:///install_drive|/Program Files/Macromedia/
Flash 8/en/Configuration/Skins/ClearOverPlaySeekMute.swf"
my_FLVPlybk.contentPath = "http://www.helpexamples.com/flash/video/
water.flv";
The attachMovie() method belongs to the MovieClip class. You can use it create an
instance of the FLVPlayback component because the FLVPlayback class extends the
MovieClip class.
3. Select Test Movie from the Control menu to execute the SWF file and start the FLV file.
NOTE
In the first two cases, a preview of the skin appears in the viewing pane above the
pop-up menu.
NOTE
Without setting the contentPath and skin properties, the generated movie clip will
appear to be empty.