
User Guide

508 FLVPlayback Component (Flash Professional Only)
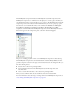
5. Click the magnifying-glass icon to open the Select Skin dialog box.
6. Select one of the following options:
■ From the drop-down Skin list, select one of the predesigned skins to attach a set of
playback controls to the component.
■ If you created a custom skin, select Custom Skin URL from the pop-up menu, and
enter, in the URL text box, the URL for the SWF file that contains the skin.
■ Select None, and drag individual FLV Playback Custom UI components to the Stage
to add playback controls.
7. Click OK to close the Select Skin dialog box.
8. Select Test Movie from the Control menu to execute the SWF file and start the video.
To use the Video Import wizard:
1. Select File > Import > Import Video.
2. Indicate the location of the video file by selecting one of the following options:
■ On my local computer
■ Already deployed to a web, FCS, or FVSS server
3. Depending on your choice, enter either the path or the URL that specifies the location of
the video file; then click Next.
4. If you selected a file path, you’ll see a Deployment dialog box next where you can select one
of the options listed to specify how you would like to deploy your video:
■ Progressive download from a standard web server
■ Stream from Flash Video Streaming Service
■ Stream from Flash Communication Server
■ Embed video in SWF and play in timeline
5. Click Next.
NOTE
In the first two cases, a preview of the skin appears in the viewing pane above the
pop-up menu.
WARNING
Do not select the Embed Video option. The FLVPlayback component plays only
external streaming video. This option will not place an FLVPlayback component on
the Stage.