
User Guide


Customizing the RadioButton component 1025
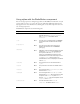
To create an application with the RadioButton component:
1. Drag two RadioButton components from the Components panel to the Stage.
2. Select one of the radio buttons. In the Component inspector, do the following:
■ Enter Yes for the label parameter.
■ Enter Flashist for the data parameter.
3. Select the other radio button. In the Component inspector, do the following:
■ Enter No for the label parameter.
■ Enter Anti-Flashist for the data parameter.
4. Drag a TextArea component from the Components panel to the Stage and give it an
instance name of
theVerdict.
5. Select Frame 1 in the main Timeline, open the Actions panel, and enter the following code:
flashistListener = new Object();
flashistListener.click = function (evt){
theVerdict.text = evt.target.selection.data
}
radioGroup.addEventListener("click", flashistListener);
The last line of code adds a click event handler to the radioGroup radio button group.
The handler sets the
text property of theVerdict (a TextArea instance) to the value of
the
data property of the selected radio button in the radioGroup radio button group. For
more information, see
RadioButton.click.
Customizing the RadioButton
component
You can transform a RadioButton component horizontally and vertically while authoring and
at runtime. While authoring, select the component on the Stage and use the Free Transform
tool or any of the Modify > Transform commands. At runtime, use the
setSize() method
(see
UIObject.setSize()).
The bounding box of a RadioButton component is invisible and also designates the hit area
for the component. If you increase the size of the component, you also increase the size of the
hit area.
If the component’s bounding box is too small to fit the component label, the label is clipped
to fit.