
User Guide

Adjusting bitmap color and tone 43
Using Auto Levels
You can use Auto Levels to have Fireworks make tonal range adjustments for you.
To adjust highlights, midtones, and shadows automatically:
1 Select the image.
2 Do one of the following to choose Auto Levels:
■ In the Property inspector, click the Add Effects button, and then choose Adjust Color >
Auto Levels from the Add Effects pop-up menu.
■ Choose Filters > Adjust Color > Auto Levels.
Note: Applying a filter from the Filters menu is destructive; that is, it cannot be undone except
when Edit > Undo is an option. To maintain the ability to adjust, turn off, or remove this filter, apply it
as a Live Effect, as described in the first bulleted option in this step. For more information, see
“Using Live Effects” on page 119.
Tip: You can also adjust highlights, midtones, and shadows automatically by clicking the Auto
button in the Levels or Curves dialog box.
Using Curves
The Curves feature is similar to the Levels feature but it provides more precise control over the
tonal range. Whereas Levels uses highlights, shadows, and midtones to correct the tonal range,
Curves lets you adjust any color along the tonal range, instead of only three variables, without
affecting other colors. For example, you can use Curves to correct for a color cast caused by
lighting conditions.
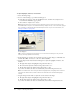
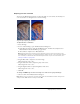
The grid in the Curves dialog box illustrates two brightness values:
The horizontal axis represents the original brightness of the pixels, shown in the Input box.
The vertical axis represents the new brightness values, shown in the Output box.
When you first open the Curves dialog box, the diagonal line indicates that no changes have been
made, so the input and output values are the same for all pixels.