
User Guide

42 Chapter 2: Working with Bitmaps
To adjust highlights, midtones, and shadows:
1 Select the bitmap image.
2 Do one of the following to open the Levels dialog box:
■ In the Property inspector, click the Add Effects button, and then choose Adjust Color >
Levels from the Add Effects pop-up menu.
■ Choose Filters > Adjust Color > Levels.
Note: Applying a filter from the Filters menu is destructive; that is, it cannot be undone except
when Edit > Undo is an option. To maintain the ability to adjust, turn off, or remove this filter, apply it
as a Live Effect, as described in the first bulleted option in this step. For more information, see
“Using Live Effects” on page 119.
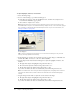
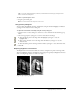
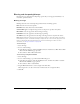
Levels dialog box
Tip: To view your changes in the workspace, choose Preview in the dialog box. As you make
changes, the image updates automatically.
3 In the Channel pop-up menu, choose whether you want to apply changes to individual color
channels (Red, Blue, or Green) or to all color channels (RGB).
4 Drag the Input Levels sliders under the Histogram to adjust the highlights, midtones, and
shadows:
■ The right slider adjusts the highlights using values from 255 to 0.
■ The center slider adjusts the midtones using values from 10 to 0.
■ The left slider adjusts the shadows using values from 0 to 255.
As you move the sliders, the values are automatically entered in the Input Levels boxes.
Note: The shadow value cannot be higher than the highlight value; the highlight value cannot be
lower than the shadow value; and the midtones must fall between the shadow and highlight
settings.
5 Drag the Output Levels sliders to adjust the contrast values in the image:
■ The right slider adjusts the highlights using values from 255 to 0.
■ The left slider adjusts the shadows using values from 0 to 255.
As you move the sliders, the values are automatically entered in the Output Levels boxes.