
User Guide

228 Chapter 12: Optimizing and Exporting
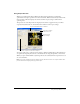
To export using Export Preview:
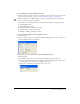
1 Choose File > Export Preview to open the Export Preview.
■ To edit optimization settings, click the Options tab. For information about the options
available on this tab, see the following procedures.
■ To edit the size and area of the exported image, click the File tab and change the
desired settings. For information about the options available on this tab, see the
following procedures.
■ To edit animation settings for the image, click the Animation tab and change the desired
settings. For information about the options available on this tab, see the following
procedures.
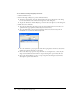
2 Use the Zoom button at the bottom of the dialog box to zoom in or out in the preview. Click
this button to activate the Zoom magnification tool and then click in the preview to magnify
the preview. Alt-click (Windows) or Option-click (Macintosh) the button in the preview to
zoom out.
3 Do one of the following to pan the preview area:
■ Click the Pointer button at the bottom of the dialog box and drag in the preview.
■ Hold down the Spacebar when the Zoom pointer is active and drag in the preview.
4 Click a split-view button to divide the preview area into two or four previews to
compare settings.
Each preview window can display a preview of the graphic with different export settings.
Note: When you zoom or pan while multiple views are open, all views zoom and
pan simultaneously.
5 Click Export when you have finished changing settings.
6 In the Export dialog box, type a name for the file, choose a destination, set any other options if
desired, and click Save.
For more information about the options in the Export dialog box, see “Exporting from
Fireworks” on page 247.