
User Guide


206 Chapter 10: Creating Buttons and Pop-up Menus
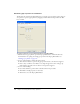
Adding pop-up menu styles
You can add custom cell styles to the Pop-up Menu Editor. Custom cell styles are available along
with the preset choices on the Appearance tab when you choose the Image option as the cell type,
which sets pop-up menus to use graphical backgrounds in their cells.
To add a custom cell style to the Pop-up Menu Editor:
1 Apply any combination of stroke, fill, texture, and Live Effects to an object, and save it as a style
using the Styles panel. For more information, see “Creating and deleting styles” on page 156.
2 Select the new style in the Styles panel, and then choose Export Style from the Styles panel
Options menu.
3 Navigate to the Nav Menu folder on your hard disk, rename the style file if you wish, and
click Save.
Note: The exact location of the Nav Menu folder varies depending on your operating system. For
more information, see “Working with configuration files” on page 286.
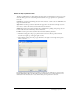
When you return to the Appearance tab of the Pop-up Menu Editor and choose the Image Cell
background option, the new style is available along with the preset styles for the Up and Over
states of the pop-up menu cells.
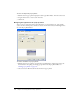
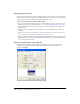
Setting advanced pop-up menu properties
The Advanced tab of the Pop-up Menu Editor offers additional settings to control cell size,
padding, and spacing; text indention; menu disappearance delay; and border width, color,
shadow, and highlight.