
User Guide


Working with hotspots and image maps 187
Preparing hotspots for export
You can use the Property inspector to assign URLs, alternate text, targets, and custom names to
hotspots. If the Property inspector is minimized, click the expander arrow in the lower right to see
all properties.
You assign hotspot properties the same way you assign slice properties. For more information on
using the Property inspector to assign URLs, alt text, target frames, and custom names, see
“Preparing slices for export” on page 180.
Creating image maps
After you’ve inserted several hotspots on top of a desired graphic, you must export the graphic as
an image map so it will function in a web browser. Exporting an image map generates the
graphics and the HTML containing map information for hotspots and corresponding URL links.
Note: Fireworks produces only client-side image maps when exporting.
As an alternative to exporting, you can copy your image map to the Clipboard and paste it into
Dreamweaver or another HTML editor.
To export an image map or copy it to the Clipboard:
1 Optimize the graphic to prepare it for export.
For more information, see “About optimizing” on page 226.
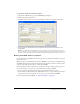
2 Choose File > Export.
3 If you are exporting your image (as opposed to copying it to the Clipboard), navigate to the
folder where you want to place the HTML file, and name the file.
If you have already built a local file structure for your website, you can save the graphic in the
appropriate folder for the site from here.
4 In the Save as Type pop-up menu, choose HTML and Images.
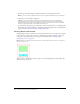
5 Choose an option from the HTML pop-up menu:
Export HTML File generates the required HTML file and corresponding graphics files, which
you can later import into Dreamweaver or another HTML editor.
Copy to Clipboard copies all required HTML, including a table if the document is sliced, to
the Clipboard so that you can later paste it into Dreamweaver or another HTML editor.
6 For Slices, choose None only if the document contains no slices.