
User Guide

168 Chapter 9: Slices, Rollovers, and Hotspots
Optimizing One challenge of web graphic design is ensuring that images download quickly
without sacrificing quality. Slicing enables you to optimize each individual slice using the most
appropriate file format and compression settings. For more information, see Chapter 12,
“Optimizing and Exporting,” on page 225.
Interactivity You can use slices to create areas that respond to mouse events. For information on
attaching interactivity to slices, see “Making slices interactive” on page 173.
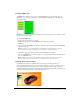
Updating parts of a web page Slicing allows you to easily update parts of a web page that
change frequently. For example, your company’s web page might have an employee-of-the-month
section that changes monthly. Slicing enables you to quickly change just the employee’s name and
photo without replacing the entire page.
Creating slice objects
You can create a slice object by drawing it with the Slice tool or by inserting a slice based on a
selected object.
The lines extending from the slice object are slice guides, which determine the boundaries of the
separate image files into which the document is split on export. These guides are red by default.
To insert a rectangular slice based on a selected object:
1 Choose Edit > Insert > Slice. The slice is a rectangle whose area includes the outermost edges of
the selected object.
2 If more than one object is selected, choose how to apply slices:
Single creates a single slice object that covers all selected objects.
Multiple creates a slice object for each selected object.
To draw a rectangular slice object:
1 Choose the Slice tool.
2 Drag to draw the slice object. The slice object appears on the Web Layer, and the slice guides
appear in the document.
Note: You can adjust the position of a slice as you drag to draw it. While holding down the mouse
button, simply press and hold down the Spacebar, then drag the slice to another location on the
canvas. Release the Spacebar to continue drawing the slice.