
User Guide


126 Chapter 6: Using Live Effects
To create a custom Live Effect using the Styles panel:
1 Apply Live Effect settings to selected objects. For more information, see “Applying Live Effects”
on page 120.
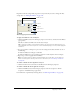
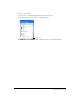
2 Choose Add Style from the Styles panel Options menu.
The Add Style dialog box opens.
3 Deselect all properties except the Effect property, enter a name, and click OK.
The custom Live Effect name is added to the Add Effects pop-up menu, and a style icon
representing the Live Effect is added to the Styles panel.
Note: If you choose any additional properties in the Add Style dialog box, the style will no longer
be an item on the Add Effects pop-up menu in the Property inspector, although it will remain on
the Styles panel as a typical style.
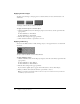
To apply a custom Live Effect to selected objects, do one of the following:
• Click the Add Effects button in the Property inspector, then choose the custom Live Effect.
• Click the icon for the custom Live Effect in the Styles panel.
You can rename or delete a custom Live Effect as you would any other style in the Styles panel.
For more information, see “Creating and deleting styles” on page 156 and “Editing styles”
on page 157.
Note: You cannot rename or delete a standard Fireworks effect.
Saving Live Effects as commands
You can save and reuse an effect by creating a command based on it. Using the History panel, you
can automate all the Live Effects applied to an object by creating a command available from the
Commands menu. You can use these commands in batch processing. For more information, see
“Performing commands with a batch process” on page 272.
To save effect settings as a command:
1 Apply the effects to the object.
2 If the History panel is not visible, choose Window > History.
3 Shift-click the range of actions you want to save as a command.