
User Guide

88 Chapter 4: Working with Bitmaps
To set Rubber Stamp tool options:
1. Select the Rubber Stamp tool.
2. Select from among the following options in the Property inspector:
Size determines the size of the stamp.
Edge determines the softness of the stroke (100% is hard; 0% is soft).
Source Aligned affects the sampling operation. When Source Aligned is selected, the
sampling pointer moves vertically and horizontally in alignment with the second. When
Source Aligned is deselected, the sample area is fixed, regardless of where you move and
click the second pointer.
Use Entire Document samples from all objects on all layers. When this option is
deselected, the Rubber Stamp tool samples from the active object only.
Opacity determines how much of the background can be seen through the stroke.
Blend Mode affects how the cloned image affects the background.
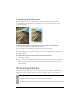
To duplicate a pixel selection, do one of the following:
■ Drag the pixel selection with the Subselection tool.
■ Alt-drag (Windows) or Option-drag (Macintosh) the pixel selection using the Pointer
tool.
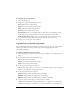
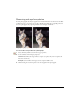
Blurring, sharpening, and smudging pixels
The Blur and Sharpen tools affect the focus of pixels. The Blur tool lets you emphasize or
deemphasize parts of an image by selectively blurring the focus of elements, much as a
photographer controls depth of field. The Sharpen tool can be useful for repairing scanning
problems or out-of-focus photographs. The Smudge tool lets you gently blend colors, as when
creating a reflection of an image.
To blur or sharpen an image:
1. Select the Blur or Sharpen tool.
2. Set brush options in the Property inspector:
Size sets the size of the brush tip.
Edge specifies the softness of the brush tip.
Shape sets a round or square brush tip shape.
Intensity sets the amount of blurring or sharpening.
3. Drag the tool over the pixels to be sharpened or blurred.
TIP
Hold down Alt (Windows) or Option (Macintosh) to change from one tool behavior to
the other.