
User Guide


Batch processing 433
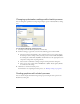
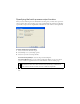
To select attributes to find and replace during a batch process:
1. Select Find and Replace from the Batch Options list and click Add.
2. Click Edit.
3. Select the type of attribute to find and replace from the Find pop-up menu: text, font,
color, URL, or Non-Web216.
4. Enter or select the specific element to find in the Find box.
5. Enter or select the specific element to replace in the Change To box.
6. Click OK to store Find and Replace settings.
7. Click Next to continue the batch process.
For information on completing the batch process, see “Batch processing” on page 426.
For more information about Find and Replace options, see “Finding and replacing”
on page 422.
Changing filenames with a batch process
You can change the names of files being processed using the Rename option in the Batch
Process dialog box.
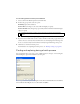
To set naming options for batch-processed files:
1. Select Rename from the Batch Options list and click Add.
2. Specify Rename options at the bottom of the Batch Process dialog box:
Replace with lets you replace characters in each filename with a different characters that
you specify, or you can delete characters from each filename. For example, if you have files
named Temp_123.jpg, Temp_124.jpg, and Temp_125.jpg, you might replace
“Temp_12” with “Birthday,” thus changing the filenames to Birthday3.jpg, Birthday4.jpg,
and Birthday5.jpg.
Replace blanks with lets you replace existing blanks in the filename with a character or
characters you specify, or you can delete all blanks from each filename. For example, files
named Pic nic.jpg and Slap stick.jpg might be changed to Picnic.jpg and Slapstick.jpg, or
Pic-nic.jpg and Slap-stick.jpg.
Add Prefix lets you enter text to add to the beginning of the filename. For example, if
you enter “night_”, then the file Sunrise.gif is renamed night_Sunrise.gif when it is
batch processed.