
User Guide


Using the Export Wizard 329
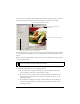
2. Use the Zoom button at the bottom of the dialog box to zoom in or out in the preview.
Click this button to activate the Zoom magnification tool and then click in the preview to
magnify the preview. Alt-click (Windows) or Option-click (Macintosh) the button in the
preview to zoom out.
3. Do one of the following to pan the preview area:
■ Click the Pointer button at the bottom of the dialog box and drag in the preview.
■ Hold down the Spacebar when the Zoom pointer is active and drag in the preview.
4. Click a split-view button to divide the preview area into two or four previews to
compare settings.
Each preview window can display a preview of the graphic with different export settings.
5. Click Export when you have finished changing settings.
6. In the Export dialog box, type a name for the file, select a destination, set any other options
if desired, and click Save.
For more information about the options in the Export dialog box, see “Exporting from
Fireworks” on page 352.
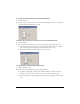
To set optimization settings using Image Preview:
1. Click the Options tab. Most of the options available here are similar to those in the
Optimize panel. For more about these options, see “Using optimization settings”
on page 332.
2. Click the Optimize to Size Wizard button to optimize a graphic based on a target file size.
Enter a file size in kilobytes and click OK.
The Optimize to Size Wizard attempts to match the requested file size using these
methods:
■ Adjusting JPEG quality
■ Modifying JPEG smoothing
■ Altering the number of colors in 8-bit images
■ Changing dither settings in 8-bit images
■ Enabling or disabling optimization settings
NOTE
When you zoom or pan while multiple views are open, all views zoom and
pan simultaneously.