
User Guide


304 Chapter 12: Creating Buttons and Pop-up Menus
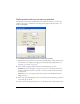
To set the position for a pop-up submenu using the Pop-up Menu Editor:
1. With the desired pop-up menu open in the Pop-up Menu Editor, click the Position tab.
For information on opening an existing pop-up menu in the Pop-up Menu Editor,
see “Editing pop-up menus” on page 304.
2. Do one of the following to define the submenu position:
■ Click a Submenu Position button to position the submenu relative to the pop-up
menu item that triggers it.
■ Enter x and y coordinates. Coordinates of 0,0 align the upper left corner of the pop-up
submenu with the upper right corner of the menu or menu item that triggers it.
3. Do one of the following:
■ To make each submenu’s position relative to the parent menu item that triggers it,
deselect the Place in Same Position option for the submenu position.
■ To make each submenu’s position relative to the parent pop-up menu, select Place in
Same Position.
4. Click Done to close the Pop-up Menu Editor or click Back to modify properties on other
tabs.
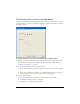
To set the position for a pop-up menu by dragging it:
1. If necessary, do one of the following to display the Web Layer:
■ Click the Show Slices and Hotspots button in the Tools panel.
■ Click the Eye column in the Layers panel.
2. Select the web object that is the trigger for the pop-up menu.
3. Drag the pop-up menu outline to another location in the workspace.
Editing pop-up menus
In the Pop-up Menu Editor, you can edit or update the contents of a pop-up menu, rearrange
the menu items, or change other properties on any of the four tabs.
To edit a pop-up menu in the Pop-up Menu Editor:
1. If necessary, do one of the following to display the Web Layer:
■ Click the Show Slices and Hotspots button in the Tools panel.
■ Click the Eye column in the Layers panel.
2. Select the slice to which the pop-up menu is attached.