
User Guide


Chapter 398
Adding Columns to the Data-Map
By adding columns to the Data-Map you can:
Add additional columns in the Shopping Cart Display
Capture additional columns into the Orders (destination database) tables.
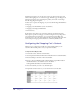
To add a column to the Data-Map content table:
1
In Content Center, open the Data-Map.
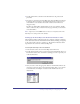
2 Click the Add Row/Column and choose Add Row from the list.
3 In the Column dialog, enter a name. The name you enter will appear in the
Shopping Cart Display element on the page. Then, from the Type list, choose
Text. In the Text Type list, choose Formatted.
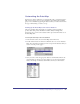
4 Now, you must enter the correct cell values for each row depending on your
source and destination database tables. See steps under Customizing the
Data-Map.
5 When you add a column to the Data-Map and the Data-Map is bound to
the Shopping Cart SmartElement, the column is defaulted as ‘not shown’.
You must add the column to the ‘Show’ side of the Shopping Cart
Content attribute.
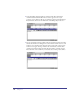
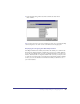
6 In the Basement, right click the Shopping Cart SmartElement and choose
Attributes.
7 In the Attributes tab, click the ellipsis button next to Static Content.