
User Guide


Quick Store Tutorial 53
3
Scroll to the bottom of the Security category and double click this Interaction:
Verify username from Username and password from Password and redirect
(store additional request in Session)
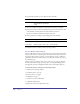
4 Set the parameters according to the following table, then click OK.
See DrumNote 3 for more information on password protecting pages with this
interaction.
Next, you will apply the submit action to the Login button. Select only the LogIn
button. Then, right click and choose Possible Activations.
5 Scroll to the Forms Submit category and double click this Activation:
6 Submit the form when LogInButton is clicked
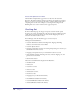
7 Set the parameters according to the following table, then click OK.
8 Right click the NewUser button and select Assign Link. In the Link dialog,
select the NewUser page (in the CheckoutArea, CheckOutLogin section).
Parameter Description Set to:
SuccessRedirect Defines the page to redirect to
when the username and
password matches a record in the
recordset
Click the Assign button. Click
the tree node. Select the Check
Out page (under the
CheckoutArea).
FailedRedirect Defines the page to redirect to
when the username and
password does not match a
record in the recordset
Click the Assign button. Click
the tree node and select the
FailedLogIn page (under the
Checkout Area >
CheckoutLogin)
AccessGroup Defines the acces group. Learn
about access groups in the eStore
User Guide.
Customer
AdditionVariableT
oForward
Stores the CustomerID in the
Session object and passes it to
the page when submitting
the page.
CustomerID
PasswordColumn Defines the password column in
the recordset.
Password
UsernameColumn Defines the username column in
the recordset.
CustomerEmail
Parameter Set to:
Validate Form Leave checked.
Replace Action With Leave blank since the form action is set by the Security
Interaction