
User Guide


Chapter 6128
Adding the CyberCash SmartElement
This example demonstrates how to add the CyberCash SmartElement and apply
interactions to authorize and capture order and payment information.
1 From Element Toolbar, add the CyberCash SmartElement to the layout. The
element shows up in the Basement.
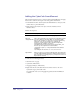
2 Right click the CyberCash server object and select Attributes. In the
Attributes Sheet.
Attribute Descriptions:
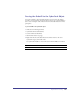
3 Shift select the following elements:
Submit button (on page)
CyberCash (in Basement)
ShoppingCartObject (in Basement)
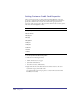
4 Right click and choose Possible Interactions. Mouse down to the eStore
CyberCash category and double click:
Set CyberCash order total to ShoppingCart grandtotal when FormButton
is clicked
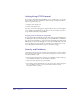
Attribute Description
Name Define the name of the object for scripting purposes
Cybercash
configuration file
Path to the Configuration File required for the CyberCash payment
processing. When you install the MCK, you specified an install
directory. The install process will create a ‘test-mck’ subdirectory,
which has a ‘mck-cgi\conf’ subdirectory containing the
merchant_conf file. Enter the path to this file for CyberCash
Configuration File attribute. For instance:
C:\\Inetpub\\wwwroot\\test-mck\\mck-cgi\\conf\\merchant_conf.
Note two peculiar requirements for this attribute:
1) CyberCash requires “\\” as the path delimiter rather than the
standard “\”
2) Including the file extension (i.e. “.txt”) causes an error.
CyberCashID When you register as a merchant with CyberCash, they will provide
you with a CyberCashID needed when sending payment requests to
their cash register. For testing purposes, you may use the ‘test-mck’
ID provided as a default.