Copyright © Rutgers Writing Program Contact Barclay Barrios (barclay.barrios@rutgers.edu) Tutorial – Macromedia Dreamweaver MX 2004 Introduction In your work at Rutgers, you may want at some point to publish your own web page or site, either for a class or personal use. One of the most widely-used and versatile programs for creating web pages today is Macromedia's Dreamweaver MX 2004.
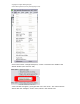
Copyright © Rutgers Writing Program Contact Barclay Barrios (barclay.barrios@rutgers.edu) If you do not see this listed in the “Start” menu, look for an icon for Dreamweaver MX 2004 on your Desktop. When you first open the program, Dreamweaver will prompt you with its own starting window; from here, you can select the type of document you would like to create. Unfortunately, there is no way to simply close this window; in order to get rid of it you must select some type of document.
Copyright © Rutgers Writing Program Contact Barclay Barrios (barclay.barrios@rutgers.edu) Different Views Dreamweaver MX 2004 is a flexible program that allows you to code in different “views”: Code View, Code and Design View, and Design View. You can switch between these views by using a series of three button icons located near the top left corner of the screen. In the Code view, Dreamweaver MX 2004 displays a web page in its raw form: HTML code.
Copyright © Rutgers Writing Program Contact Barclay Barrios (barclay.barrios@rutgers.edu) Program Layout One of the main differences between Dreamweaver MX 2004 and previous versions of the program is the layout of the interface, which includes several panels and tabs. When you first open Dreamweaver MX 2004, you will be greeted with a barrage of panels, mostly located on the right side of the screen, and a list of tabs positioned horizontally on the top of the screen.
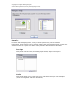
Copyright © Rutgers Writing Program Contact Barclay Barrios (barclay.barrios@rutgers.edu) Click on the button “Change Workspace,” which is located in the middle of the default window (the “General” tab). A new window will appear, giving preview of the two views. This tutorial will be written with the “Designer” view in mind, which is the default view.
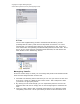
Copyright © Rutgers Writing Program Contact Barclay Barrios (barclay.barrios@rutgers.edu) Panels For basic web designing tasks, many of these panels may not be needed. Fortunately, these panels can be closed, making the main Dreamweaver screen less cluttered. Here is a quick run-down of the panels in Dreamweaver MX 2004: Design This panel controls CSS (Cascading Style Sheet) Styles and Layers.
Copyright © Rutgers Writing Program Contact Barclay Barrios (barclay.barrios@rutgers.edu) Application This panel is meant exclusively for managing database functions embedded in web pages. Since this is a basic tutorial, we will not go into depth about databases in Dreamweaver MX 2004. Tag Inspector The Tag Inspector will allow you to fine-tune and change certain attributes, specifically in the Code View.
Copyright © Rutgers Writing Program Contact Barclay Barrios (barclay.barrios@rutgers.edu) Files Of all of the supplementary panels in Dreamweaver MX 2004, you will probably find the “Files” panel the most important and useful. It is in this window that you organize files related to your web page or site, and is the main mechanism for uploading and downloading files to/from the web. Since this is such a major function of Dreamweaver MX 2004, we will discuss the Files window in the “Publishing” section.
Copyright © Rutgers Writing Program Contact Barclay Barrios (barclay.barrios@rutgers.edu) area without the panels cluttering up the main Dreamweaver MX 2004 screen. Click on this button again to view the panels. Alternatively, you can right-click on any one of the panels and select “Close Panel Group” to close the panel completely. To re-open a panel that you have closed, you can go to the menu bar and select the panels you want from “Window.
Copyright © Rutgers Writing Program Contact Barclay Barrios (barclay.barrios@rutgers.edu) 1. Hyperlink: Clicking on this brings up a window that lets you create a link to another web page, file, or location on the same page. 2. E-Mail Link: Email links allow visitors to a site send someone an email by clicking on a special link. Using this tool allows to you easily make such a link. 3. Named Anchor: An anchor is a special kind of link that takes a user to a different part of the same page.
Copyright © Rutgers Writing Program Contact Barclay Barrios (barclay.barrios@rutgers.edu) 3. Draw Layer: Physically draw a new “layer” onto your web page. 4. Standard 5. Expanded 6. Layout These three extra views allow you to design and control your layout to an extreme degree. 7. Layout Table: While in the extra “Layout” view, you can draw a table to be used as a layout. 8. Draw Layout Cell: Similar to the above, while in the “Layout” view, you can draw cells to be used in designing a layout. 9.
Copyright © Rutgers Writing Program Contact Barclay Barrios (barclay.barrios@rutgers.edu) 10. Image Field: Inserts an image field at the cursor; will prompt you for an image. 11. File Field: Inserts a file field at the cursor; typically seen used to attach files to an email. 12. Button: Inserts a button at the cursor. 13. Label: Brings you into the Code View and inserts a bit of coding. 14.
Copyright © Rutgers Writing Program Contact Barclay Barrios (barclay.barrios@rutgers.edu) 17. Definition Description: Allows the placement of a definition description in a list. 18. Abbreviation: Allows the indication of an abbreviation with the full title. 19. Acronym: Allows the indication of an acronym with the full meaning. 20. Characters: Allows the quick insertion of special characters, such as a line break, the Pound/Euro/Yen symbols, Em Dash, etc.
Copyright © Rutgers Writing Program Contact Barclay Barrios (barclay.barrios@rutgers.edu) Creating a New Page When Dreamweaver MX 2004 has loaded you have the option of opening a blank page. If you have turned this off, you can get a new blank web page by going to the menu bar and selecting "File," and then "New" (shortcut “Ctrl+N”). A window called “New Document” that lists different types of blank documents will appear.
Copyright © Rutgers Writing Program Contact Barclay Barrios (barclay.barrios@rutgers.edu) Use the window that pops up to browse through your computer to open the file. When you find the file you want to open, click on the “OK” button. NOTE: Dreamweaver MX 2004 is capable of opening any kind of website file, regardless of whether or not it was originally created in Dreamweaver MX 2004.
Copyright © Rutgers Writing Program Contact Barclay Barrios (barclay.barrios@rutgers.edu) You can name whatever other pages you create however you like. For example, most pages that contain links to other websites are saved as "links.html" (or, alternatively, you can create a new folder in the same directory as your "index.html", name that new folder "links," and save your links page in the new directory as "index.html"). For example, your main page's URL might look like this: http://www.rci.rutgers.
Copyright © Rutgers Writing Program Contact Barclay Barrios (barclay.barrios@rutgers.edu) You will want to have multiple web pages on your site, most likely, and you'll want them all to have the same layout and navigation, but different content. There are several reasons why. The major reason is that you want your site to have a consistent look and feel.
Copyright © Rutgers Writing Program Contact Barclay Barrios (barclay.barrios@rutgers.edu) When you're designing a website, you'll probably want to customize the look of your site. For starters, you can change the style of the links, the page color, and other features by working with the Page Properties in Dreamweaver MX 2004. Opening the Page Properties You can open up the Page Properties window by going to the menu bar and selecting "Modify," and then "Page Properties," which is the first option listed.
Copyright © Rutgers Writing Program Contact Barclay Barrios (barclay.barrios@rutgers.edu) 1. Page Font: Allows you to 2. Size: Allows you to 3. Text Color: Allows you to 4. Background Allows you to 5. Background Allows you to 6. Margins: Allows you to pages. set the default font face for your web pages. set the default font size for your web pages. set the default font color for your web pages. Color: set the default background color for your web pages.
Copyright © Rutgers Writing Program Contact Barclay Barrios (barclay.barrios@rutgers.edu) 7. Underline style: Allows you to change the style that links appear as/in (underlined, not underlined, underlined only on rollover, etc.) Headings: 1. Heading font: Allows you to set the default font that all headings will appear as/in. 2. Heading 1-6: Allows you to set the font size that these headings will appear as/in.
Copyright © Rutgers Writing Program Contact Barclay Barrios (barclay.barrios@rutgers.edu) 1. Title: Allows you to set a default title all pages will begin with in the title bar. 2. Encoding: Allows you to set the type of language encoding that the web pages will all be using (Western European, Unicode, etc.
Copyright © Rutgers Writing Program Contact Barclay Barrios (barclay.barrios@rutgers.edu) 1. Tracing image: Allows you to browse for and set an image that you will literally “trace” in the layout design process. 2. Transparency: Allows you to set the transparency of the tracing image. Text As you work with Dreamweaver MX 2004, you'll notice it is similar in many ways to the programs you may have worked with in the past, such as Microsoft Word.
Copyright © Rutgers Writing Program Contact Barclay Barrios (barclay.barrios@rutgers.edu) 1. Minimize/Maximize: Collapses the Properties panel back and forth. 2. Format: Allows you to pick a pre-set format for the selected text. 3. Style: Allows you to pick a pre-set selection from a Cascading Style Sheet to format the selected text. 4. Bold: Puts the selected text in bold face. 5. Italics: Puts the selected text in italics. 6. Align Left: Left-aligns the selected text. 7.
Copyright © Rutgers Writing Program Contact Barclay Barrios (barclay.barrios@rutgers.edu) 21. Text Outdent: ”Outdents” the text back to the left. 22. Text Indent: ”Indents” the text over to the right. 23. Target: Allows you to link to a specific target within the same web page. 24. Page Properties: Brings up the “Page Properties” series of windows. 25. List Item: Opens the “List Properties” box.
Copyright © Rutgers Writing Program Contact Barclay Barrios (barclay.barrios@rutgers.edu) Introduction to Style Sheets As you may have read in the previous section, a "style" is a specific format applied to either a small or large sample of text, over the range of one or many documents. You can use (or even create) a "style" that you can apply throughout your document (or multiple documents!) to any variety of text to keep a common look and feel throughout your pages.
Copyright © Rutgers Writing Program Contact Barclay Barrios (barclay.barrios@rutgers.edu) From here, you can choose to make a new CSS style (it will automatically ask you to save it in a new style sheet), edit a previously existing style sheet, or attach a style sheet to a page. You are free to apply, as necessary and appropriate, styles to your document. However, it is in no way necessary if you are creating small pages that are easy to format on their own.
Copyright © Rutgers Writing Program Contact Barclay Barrios (barclay.barrios@rutgers.edu) each work. However, the first word in the name should be lowercase. An example of a good name for a style would be “.smallHeading”. For “Type,” select “Class.” Click the “OK” button. The “Save Style Sheet As” window will now appear. Give your style sheet a unique name, and be sure to end it with “.css”. When you click “Save,” a new style sheet file will be saved, and you can begin to create your own styles.
Copyright © Rutgers Writing Program Contact Barclay Barrios (barclay.barrios@rutgers.edu) A new blank page will appear with the words “<< CSS >>” at the top. This is a comment that indicates that you are working with a style sheet. This will have no effect on the code you will create. Hand-Code a New Style Now it’s time to set up some styles of your own. Body The first style you should create is one that controls the look of the page itself.
Copyright © Rutgers Writing Program Contact Barclay Barrios (barclay.barrios@rutgers.edu) In Dreamweaver MX 2004, your styles sheet should now look something like this: Save a Style Sheet Let’s save this style sheet as it current is, and then apply it to a web page. Go to the menu bar and select “File” and then “Save As.” Give your style sheet a name, and add “.css” at the end of the file name. For example, you can name your file “stylesheet.
Copyright © Rutgers Writing Program Contact Barclay Barrios (barclay.barrios@rutgers.edu) Now that you have saved your style sheet, you can now apply it to as many web pages in your site as you like. Apply a Style Sheet to a Page Open up a page in Dreamweaver MX 2004. Since we will be working with a style sheet, you will need to have access to the “Design” panel. If it is not yet already open, go to the menu bar and select “Window” and the “CSS Styles.
Copyright © Rutgers Writing Program Contact Barclay Barrios (barclay.barrios@rutgers.edu) Once you have found the file you want to attach, click the “OK” button. Go back to the “Design Panel” and click on the radio button next to “Edit Styles.” In this mode, you can edit previously defined styles, and create some new ones using Dreamweaver MX 2004’s “CSS Style Definition” menus, which you will soon see. You will also notice that all of the styles you created in your sheet are listed here.
Copyright © Rutgers Writing Program Contact Barclay Barrios (barclay.barrios@rutgers.edu) The style will immediately be applied to the highlighted text. Remove a Style From Text Removing a style from text or any other web page element is just as easy as applying it. First, put your cursor inside the text with the style you want to remove.
Copyright © Rutgers Writing Program Contact Barclay Barrios (barclay.barrios@rutgers.edu) Go down to the Properties panel, and click the “Style” menu. Select “None” (the topmost option), and the style should be removed from the text. Create a New Style For Your Style Sheet CSS is a great tool because you can make an infinite number of styles for nearly anything on a web page. You can make a style just for headings, links, table borders, or just about anything you can imagine.
Copyright © Rutgers Writing Program Contact Barclay Barrios (barclay.barrios@rutgers.edu) each work. However, the first word in the name should be lowercase. An example of a good name for a style would be “.smallHeading” For “Type,” select “Class.” This means that you will be making a style from scratch. Click the “OK” button. The “CSS Style Definition” window will appear. At this point, you can use the various menus to make your very own style.
Copyright © Rutgers Writing Program Contact Barclay Barrios (barclay.barrios@rutgers.edu) Edit a Style You can edit any of the styles you have made in a style sheet at any time. Simply click on the style that you want to edit while you are in the “Edit Styles” mode, and click on the “Edit Style” icon (the icon on the right near the bottom of the panel, shaped like a pencil). The “CSS Style Definition” window will now appear, and you can edit a style as needed.
Copyright © Rutgers Writing Program Contact Barclay Barrios (barclay.barrios@rutgers.edu) When you select “Insert” >> “Table,” a pop up window will appear. It will ask you to input some information about your table. The information you input in this Table window will decide what your table will look like. This window has a few text fields that you will need to know about. Read the numbered list below and use the corresponding numbers on the image to see how to insert your table: 01.
Copyright © Rutgers Writing Program Contact Barclay Barrios (barclay.barrios@rutgers.edu) 05. Border Thickness: The thickness of a border surrounding the table (zero/0 for no border). 06. Cell Padding: The padding between items inside a cell and the cell’s borders. 07. Cell Spacing: The padding between cells, themselves. 08. Header: The header area will automatically be formatted for titles, etc. 09. Caption: A caption (or title) for the table that will appear immediately above it. 10.
Copyright © Rutgers Writing Program Contact Barclay Barrios (barclay.barrios@rutgers.edu) 09. Align: The alignment of the table (left, center, right). 10. Border: The width of the table’s border (zero/0 for no border). 11. Class: The CSS style that the table will adhere to. 12. Column Width/Height Quick-Clicks: Allows for quick formatting / changing of the table’s height and width attributes. 13. BG Color (Color Chooser): Choose the table’s background color with the eyedropper tool. 14.
Copyright © Rutgers Writing Program Contact Barclay Barrios (barclay.barrios@rutgers.edu) Select Table: Just as the name implies, this option selects your entire table. Merge Cells: This is a helpful option that lets you merge multiple cells into one cell. Split Cell: By selecting or putting the insertion point in a cell, you can split that cell into any number of rows or columns. Insert Row: Put the insertion point where you want to insert a new row, and this option inserts one new row.
Copyright © Rutgers Writing Program Contact Barclay Barrios (barclay.barrios@rutgers.edu) Insert Column: Similar to the above, this option inserts one new column. Insert Row of Columns: This option gives you more flexibility than the above two options. You can choose how many rows or columns you want to add, and where you want them to be inserted. Delete Row: Select or put the insertion point in the row that you want to delete, and select this option.
Copyright © Rutgers Writing Program Contact Barclay Barrios (barclay.barrios@rutgers.edu) Before using any images from other websites, be sure to take some factors into consideration. Are the images copyrighted? If so, you may not be able to use them. Try to use images that you feel are widely used, already, across the Internet. If you do use images from other sites, it is generally proper "netiquette" to include a small credit and link back to the site where the image (or images) were obtained.
Copyright © Rutgers Writing Program Contact Barclay Barrios (barclay.barrios@rutgers.edu) PNG (*.png), or "Portable Network Graphics," is a lossless image compression (meaning that even when an image is saved as a PNG file, it will look exactly the same as the original file, unlike GIF and JPG). While it is not in extremely wide use, it has its advantages over other formats in that it does not lose any quality. This does mean, however, the filesize will generally be larger.
Copyright © Rutgers Writing Program Contact Barclay Barrios (barclay.barrios@rutgers.edu) To wrap the text around an image, use the "Align" drop-down menu at the far bottom right of the Properties palette. The two options you will probably want are "Left" and "Right." If you select "Left," the image will be aligned to the left-hand side of your document (or table cell), and the text will wrap around the top, right hand side, and bottom of the image.
Copyright © Rutgers Writing Program Contact Barclay Barrios (barclay.barrios@rutgers.edu) Resizing an image in Dreamweaver MX 2004 does not physically change the properties of the image. You are not really resizing the image, but rather, telling Dreamweaver MX 2004 the size at which to display an image on a web page. If you are familiar with Adobe Photoshop, or another image editing program, it is recommended that you edit images there.
Copyright © Rutgers Writing Program Contact Barclay Barrios (barclay.barrios@rutgers.edu) Alternatively, dark links on a light background are also easy to see. Basically, try to steer clear of using link colors that blend in with your background color. Creating a Link to Another Site Making a link to a website or another web page that is not in your site is very simple. First, select the text that you want to turn into a link.
Copyright © Rutgers Writing Program Contact Barclay Barrios (barclay.barrios@rutgers.edu) The "Select File" window lets you browse your computer's folders to find the file you want to link to. When you click on the file name that you want to link to, the name will appear in the "File name" text box near the bottom of the window. Click on the "Select" button when you find the file that you want to turn into a link.
Copyright © Rutgers Writing Program Contact Barclay Barrios (barclay.barrios@rutgers.edu) There are several instances where you might want to make images as links. For example, if you have your navigation set up for your set that a different image represented a different section of your site, clicking on an image link would take the user to that section.
Copyright © Rutgers Writing Program Contact Barclay Barrios (barclay.barrios@rutgers.edu) filename (for example, an image of Murray Hall might be named "murray.jpg" if it's an image in JPEG format). Select the text (or image) you want to link to another file. Similar to linking to a page, you're going to enter the text into the "Link" box in the Properties palette. Instead of, say, linking to a page named "links.html," you're going to type in "murray.
Copyright © Rutgers Writing Program Contact Barclay Barrios (barclay.barrios@rutgers.edu) A "save" box will then pop up, asking you where you would like to download the file. Select the destination, and click "Save." The file will begin to download. Depending upon your computer's speed and your Internet connection speed (and the size of the file being downloaded), download times can be anything in the world (a small image will download much faster than a large video, for example).
Copyright © Rutgers Writing Program Contact Barclay Barrios (barclay.barrios@rutgers.edu) Now it's time to learn how to do the second step in making anchored links. At this point, you have made the actual anchor link that will be clicked on by users. But, you don't have anything to link to on your page! In order to do this, you need to create what is called the "named anchor." This is the physical anchor itself.
Copyright © Rutgers Writing Program Contact Barclay Barrios (barclay.barrios@rutgers.edu) A dialogue box will pop up asking you to put in the name of the anchor. Put in the same exact name that you put in for the anchor link. If you don't, then the anchored link will not work. The link from the previous step must has some place to link to. Now, you are creating that place, and it must have the same name as the link you have already created.
Copyright © Rutgers Writing Program Contact Barclay Barrios (barclay.barrios@rutgers.edu) web. While that might sound difficult, fortunately Dreamweaver MX 2004 comes with a built-in publishing feature that allows you to put your files on to the web with little effort. However, there are a few steps you need to learn in order to complete the process of publishing. This part of the tutorial will discuss issues related to putting your web pages on the web.
Copyright © Rutgers Writing Program Contact Barclay Barrios (barclay.barrios@rutgers.edu) will be asked to define what is called a "New Site." Defining you Site means telling the program where you will be publishing your files on the web as well as where your files are located locally on your computer. You will only be asked to make a New Site once, but if you ever want to make additional web sites, you'll need to go and define a whole new site using this feature.
Copyright © Rutgers Writing Program Contact Barclay Barrios (barclay.barrios@rutgers.edu) The next screen will ask if you want to use a server technology; Dreamweaver MX 2004 wants to know if any database technology will be included in your site. Since you will most likely be making a simple site, click “No” and then click on the “Next” button to continue to the next step.
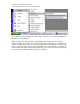
Copyright © Rutgers Writing Program Contact Barclay Barrios (barclay.barrios@rutgers.edu) Now, you’ll be asked how you want to edit your site files, and how you want to upload them to the web. Your safest bet is to select the first option, which allows you to edit your site files that you have saved in a folder in your computer, and upload them later whenever you are ready. You’ll also choose where your files are located. If you already have a directory with web site files, choose that one.
Copyright © Rutgers Writing Program Contact Barclay Barrios (barclay.barrios@rutgers.edu) You’ll have to locate on your computer the folder where all of your site files are located. Next to “Where on your computer do you want to store your files?,” you’ll see a small folder icon. Click on this icon to browse your computer to find the desired folder. Click on the “Next” button when you are done. The next section is one of the most important.
Copyright © Rutgers Writing Program Contact Barclay Barrios (barclay.barrios@rutgers.edu) • • • • For “What folder on the server do you want to store your files in?,” type in "public_html" For “What is your FTP Login:,” type in your RCI account user name. Don't put your actual name—put your username—without "@rci.rutgers.edu" Leave the Password text box blank if you are working on a public computer, such as in a computer lab. If you are on your own machine, feel free to save the password.
Copyright © Rutgers Writing Program Contact Barclay Barrios (barclay.barrios@rutgers.edu) The next screen will ask if you want to enable check in / check out. We will discuss what checking in and checking out means later on in the “Collaborating” section. Select “No” and click on the “Next” button. The last screen gives a summary of all of the specifications for the site you just defined. If everything looks correct, click “Done.
Copyright © Rutgers Writing Program Contact Barclay Barrios (barclay.barrios@rutgers.edu) There are some disadvantages to using the “Basic” site definition wizard. The “Basic” view actually makes some of the steps more confusing than they should be. In fact, you may not even need many of the steps the “Basic” set up takes you through, so you may fill in information that is not necessary for the site definition. In the “Advanced” view, all of the sections are clearly defined for you.
Copyright © Rutgers Writing Program Contact Barclay Barrios (barclay.barrios@rutgers.edu) On the left side of the window, you will see an area called "Category." You should be in the "Local Info" category. “Local Info” is the step when you tell Dreamweaver MX 2004 where the site you are working on is located on your computer. Next to "Site Name," type in a name for your site, which can be anything you want it to be.
Copyright © Rutgers Writing Program Contact Barclay Barrios (barclay.barrios@rutgers.edu) • • • • • Next to "FTP Host," type in "ftp.rci.rutgers.edu". If you are uploading files to different web space, fill in the information as necessary Next to "Host Directory," type in "public_html" Next to "Login," type in your RCI account user name. Don't put your actual name—put your username—without "@rci.rutgers.
Copyright © Rutgers Writing Program Contact Barclay Barrios (barclay.barrios@rutgers.edu) this feature is essential, since it helps to prevent people from overwriting each other’s work. When you are done putting in all the information, click the “OK” button. After that, a window called “Edit Sites” will appear. You don’t need to do anything in this window, since you just created a new site, so click “Done.
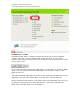
Copyright © Rutgers Writing Program Contact Barclay Barrios (barclay.barrios@rutgers.edu) If you have not saved your password, a new window will appear asking for it. Enter your RCI password and click “OK.” You will know you have connected to your web space when they gray dot on the “Connect” icon turns green. Uploading Your Files to the Web Before you begin uploading your files to your web space, you must first learn the icons listed in the “Site” window that will help manage your files. 1.
Copyright © Rutgers Writing Program Contact Barclay Barrios (barclay.barrios@rutgers.edu) You know your files have been published to your RCI account when you see the files appear on the left side of the screen. This means that the files have been transferred to your web space. Now, you have a site that you can find on the Web. To view it in a browser, just type in the following: http://www.rci.rutgers.edu/~yourusername/your_file_title.
Copyright © Rutgers Writing Program Contact Barclay Barrios (barclay.barrios@rutgers.edu) A new window will appear asking which site you’d like to edit. Choose the appropriate site and click the “Edit.” Clicking “Edit” will bring up the familiar window from before, where you originally entered in all of the information. Simply change anything that warrants changing. In addition to “Edit,” though, there are a few other options: New: This does the same function as the "New Site" feature.
Copyright © Rutgers Writing Program Contact Barclay Barrios (barclay.barrios@rutgers.edu) Done: Click on the "Done" button when you are finished working with this window. Help: Brings up the help documentation if you need assistance editing your site definitions. Templates Websites tend to have more than one page to them. While websites are not always like books (with a specific beginning, middle, and end), they still have many different parts.
Copyright © Rutgers Writing Program Contact Barclay Barrios (barclay.barrios@rutgers.edu) have not created a new one yet. In the "Save As" box, give your template an original name that makes sense and you will remember. When you're done, click "Save." A new folder called "Templates" will be generated for you (it will be inside the folder where your site files are saved on your computer). The template will have the file extension of DWT (*.
Copyright © Rutgers Writing Program Contact Barclay Barrios (barclay.barrios@rutgers.edu) In the "New Editable Region" box, give the region a name. For example, if it is indeed for the body text, you could name the editable region "body_text". Just remember as you make editable regions that you cannot give the same name to more than one. You'll notice the area become highlighted by a color, and it will have a small tab above it that names the editable regions with whatever name you gave it.
Copyright © Rutgers Writing Program Contact Barclay Barrios (barclay.barrios@rutgers.edu) Creating a New Page From a Template The reason why Templates are so powerful is because you can create new blank pages with a template you designed already attached to them. You do this by creating a new page from a template. First, go to the menu bar and select “File” and then “New.” The “New Document” window will then appear. You should currently be in the “General” tab, but that’s about to change.
Copyright © Rutgers Writing Program Contact Barclay Barrios (barclay.barrios@rutgers.edu) that you cannot change what's there, since it hasn't been defined as editable. Finally, you will notice that in the upper-right corner of the page, there is a small tab that tells you the template from which the page has been derived. You are free to format the page as you wish. The only restriction is that you can only edit something in an editable region.
Copyright © Rutgers Writing Program Contact Barclay Barrios (barclay.barrios@rutgers.edu) You're now ready to apply this new menu to all documents created from this template. To do this, save the template like you normally would any other page. You will be asked if you’d like to update all pages created from this template. Click “Update” to proceed.
Copyright © Rutgers Writing Program Contact Barclay Barrios (barclay.barrios@rutgers.edu) project using Dreamweaver MX 2004. This is referred to as "collaborating." Different people will work on different parts of the same project at various times, so you'll need some way to keep track of who has what, what's been done, etc. Luckily, Dreamweaver MX 2004 makes this whole process a simple task.
Copyright © Rutgers Writing Program Contact Barclay Barrios (barclay.barrios@rutgers.edu) When you are done, click the “OK” button here, and then “Done” on the next window that appears. Go ahead and now connect to your site's server space. Synchronize Once you're connected, the first thing you must do is "synchronize" with the server. To do this right-click on a folder (usually the main, top-level folder) in the Site window, and click “Synchronize.
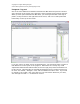
Copyright © Rutgers Writing Program Contact Barclay Barrios (barclay.barrios@rutgers.edu) In the “Synchronize Files” window that appears, select “Entire Site” for “Synchronize.” In the "Direction" window, you really have two choices you can make. If you're starting up the files on the server space for the first time (that is, there's absolutely nothing up there that has been uploaded, and you want to put files up there), select "Put newer files to remote.
Copyright © Rutgers Writing Program Contact Barclay Barrios (barclay.barrios@rutgers.edu) The “Delete” checkbox at the bottom is a powerful tool that should be handled with care. Depending on your situation (putting or getting files), it will delete whatever files it finds on one side that are not on another. For example, let’s pretend you are “getting” the newest files off of the remote server. You have an empty “images” folder on your local side, which is not on the remote side.