
Quick Start Guide


Insert layers 163
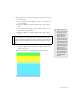
7. After you have three more layers on the page, use the Property inspector
to do the following:
■ Select the first layer, name it header, and size it to 700 pixels wide
by 24 pixels high.
■ Press Enter (Windows) or Return (Macintosh) to apply your last
entry.
■ Select the second layer, name it center_content, and size it to 700
pixels wide by 350 pixels high.
■ Press Enter (Windows) or Return (Macintosh) to apply your last
entry.
■ Select the third layer, name it footer, and size it to 700 pixels wide
by 24 pixels high. Press Enter (Windows) or Return (Macintosh) to
apply your last entry.
When you’re finished, your page should look something like this:
TIP
When you select a
layer, be sure to click
somewhere on the
layer border or the
layer’s selection
handle, and not
inside the layer. You
can be sure the layer
is selected if you see
resize handles on the
borders of the layer,
and width and height
properties in the
Property inspector.
You can also select a
layer by clicking its
name in the Layers
panel (Window >
Layers).
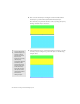
NOTE
When you resize the center_content layer to 350 pixels high, it will overlap
the remaining layer on the page. Before you proceed with the next step,
move the remaining layer below the center_content layer by selecting the
remaining layer and dragging the selection handle to the bottom of the
page.