
User Guide


Chapter 284
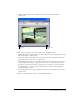
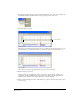
3 To place the Pause button on the Stage, verify that frame 55 is selected, and drag the Pause
button from the Cast window to the left side of the Stage window, directly beneath the
QuickTime sprite and to the right of the Play button. Again, precise placement isn’t
necessary yet.
The Pause button’s sprite appears on the Stage and in channel 3, frames 55 through 64,
of the Score.
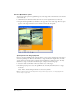
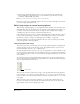
4 Verify that frame 55 is selected, and drag the Rewind button from the Cast window to directly
beneath the QuickTime sprite and to the right of the Pause button. The Rewind button’s sprite
appears on the Stage and in channel 4, frames 55 through 64 of the Score.
Now all three QuickTime playback buttons are in place on the Stage. Each has a white
bounding box around it. You can change the ink for all three sprites at once by selecting them
all in the Score or on the Stage and selecting the new ink in the Property inspector.
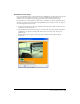
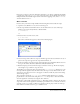
5 In the Score or on the Stage, Shift-click the three buttons.
6 Select Background Transparent from the Ink pop-up menu on the Property inspector Sprite
tab. The white bounding boxes of the sprites become transparent.
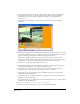
7 To place the buttons precisely, select a button on the Stage and use the Sprite tab of the
Property inspector to give the buttons the following x- and y- coordinates:
• For the Play button, type 54 in the X text box and 269 in the Y text box, and press Enter
(Windows) or Return (Macintosh).
• For the Pause button, type 142 in the X text box and 269 in the Y text box, and press Enter
(Windows) or Return (Macintosh).
• For the Rewind button, type 230 in the X text box and 269 in the Y text box, and press Enter
(Windows) or Return (Macintosh).
Note: As you complete the tutorial, remember to save your movie frequently.
Later in this tutorial, you’ll add Lingo to the buttons to make them functional.