
User Guide


84 Chapter 4: Animation
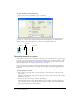
To open the Sprite Tweening dialog box:
• Select a sprite, then select Modify > Sprite > Tweening.
A keyframe usually indicates a change in sprite properties. Properties that can be tweened are
position, size, rotation, skew, blend, and foreground and background color. Each keyframe
defines a value for all of these properties, even if you only explicitly define one.
Tweening the path of a sprite
Sprite paths are the lines Director displays on the Stage to show the movement of a sprite. Sprite
paths are controlled by the Sprite Overlay Settings dialog box. You can change settings to make
the paths appear for all sprites, for selected sprites, or only when the pointer rolls over a sprite.
For more information, see “Using the Sprite Overlay” on page 61.
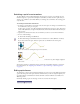
You can tween a sprite directly on the Stage by editing the sprite’s path. Director displays the
path of the selected sprite directly on the Stage. You can adjust the path by dragging keyframe
indicators.
To tween the path of a sprite:
1 Place a sprite on the Stage where you want the path to start. If the sprite is already on the
Stage, select it.
This places the start frame of the sprite in the proper location. The start frame is also the first
keyframe of the sprite.
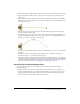
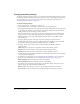
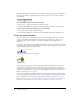
2 If necessary, select View > Sprite Overlay > Show Paths.
The Show Paths option is on by default. With this option turned on, Director displays the
paths of moving sprites on the Stage. Keyframes appear as hollow circles. Small tick marks
show the sprite’s position in tweened frames.
Keyframes
Start frame
End frame