
User Guide


66 Chapter 3: Sprites
Positioning sprites with the Property inspector
You can use the Property inspector to specify the exact coordinates of a sprite.
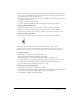
To set sprite coordinates in the Property inspector:
1 With the Property inspector open and in Graphical view, select a sprite to reposition.
2 On the Sprite tab in the Property inspector, specify the sprite coordinates in pixels, with 0,0 at
the upper left corner of the Stage, as follows:
■ Specify attributes in the X and Y text boxes to change the horizontal and vertical coordinates
of the registration point.
■ Specify coordinates in the W and H text boxes to change the width and height of the sprite.
■ Specify values in the L, T, R, and B text boxes to change the left, top, right, and bottom
edges of the sprite’s bounding rectangle.
To move the sprite without resizing it, adjust only the x and y coordinates.
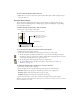
Positioning sprites with the Tweak window
You can use the Tweak window when you want to move sprites by a certain number of pixels.
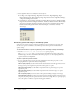
To position sprites with the Tweak window:
1 Select Modify > Tweak.
2 Select the sprite or sprites you want to move, as described in “Selecting sprites” on page 53.
3 In the Tweak window, drag the point on the left side of the window or enter the number of
pixels in the text boxes for horizontal and vertical change, and then click Tweak.
4 If you want to repeat the move, click Tweak again.
Positioning sprites using guides, the grid, or the Align window
On the Stage, you can align sprites by using guides, the grid, or the Align window.
The grid consists of cell rows and columns of a specified height and width that you use to assist
you in visually placing sprites on the Stage. The grid is always available.
Guides are horizontal or vertical lines you can either drag around the Stage or lock in place to
assist you with sprite placement. You must create guides before they become available.
Moving a sprite with the Snap to Grid or Snap to Guides feature selected lets you snap the sprite’s
edges and registration point to the nearest grid or guide line. When you are not using the guides
or the grid, you can hide them.
Guides and the grid are visible only during authoring.
You can create and modify the guides and the grid from the Property inspector or by using
menu commands.
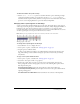
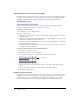
To add and configure guides:
1 With the Property inspector open, click the Guides tab.
The top half of the tab contains settings for Guides.
2 To change the guide color, click the Guide Color box and select a different color.
3 Select the desired options to make the guides visible, to lock them, and to make the sprites snap
to the guides.