
User Guide


Changing Publish Settings 455
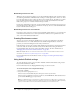
Setting Projector options
The Projector tab lets you set options that include how the projector movie appears on stage or in
a browser, and what type of player it is shown on.
To set options using the Projector tab:
1 Select File > Publish Settings and click the Projector tab.
2 Set the options you want and click OK to keep your settings and return to the movie or Publish
to begin the projector publishing process.
For more information about setting Projector options, see “Creating projectors” on page 460.
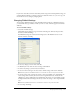
Setting Files options
The Files tab lets you set file options for projectors. For example, by default a projector consists of
just the current movie, but you can add external casts to the movie using this tab. You can also
exclude Xtra extensions from your projector.
To set options using the Files tab:
1 Select File > Publish Settings and click the Files tab.
2 To set the Primary movie components for your projector, select from the following options:
Include linked cast files lets you include automatically all linked cast files to the
primary movie.
Exclude all xtras lets you exclude some or all Xtra extensions from your projector. For more
information, see “Excluding Xtra extensions from projectors” on page 462.
Compress files (Shockwave format) lets you compress files for a Shockwave projector as you
would for standard Shockwave content.
Add Files opens a dialog box that lets you select and add Director Movie or Cast files to the
current projector.
Remove All deletes all added files.
Play every movie in list ensures all movies in your movie list play.
Loop sets the movie to keep playing.
3 Click OK to save changes and return to the movie.
4 Click Cancel to reject changes and return to the movie.
5 Click Publish to publish the projector with these settings.