
User Guide


454 Chapter 23: Packaging Movies for Distribution
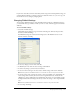
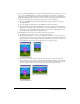
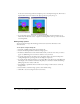
Selecting a publishing format
Use the Formats tab to select the movie format you want and determine the types of files you wish
to publish. It includes support for creating cross-platform projectors.
To set options using the Formats tab:
• To publish a Projector movie, click Projector. You can set more Projector options by using the
Projector tab. For more information, see “Setting Projector options” on page 455.
• To publish a projector that will run on a different platform than the one in which you are
authoring, select Macintosh projector (Windows) or Windows projector (Macintosh). For
more information about creating cross-platform projectors, see “About cross-platform
projectors” on page 463.
• To publish a Shockwave file (DCR) without an HTML file, select Shockwave File. You can set
additional Shockwave options using the Shockwave tab. For more information, see “Setting
Shockwave options” on page 456.
• To publish Shockwave content with an HTML file, select HTML; you can set additional
Shockwave HTML properties using this tab. For more information, see “Setting HTML
options” on page 456.
• To publish an Image file, select Image file. You can set additional Shockwave image options
using this tab. For more information, see “Setting Image options” on page 458.
• To be prompted if you want to replace existing files, select Confirm when replacing files.
• To be prompted for the location you want to publish to, select Prompt for location
when publishing.
• To automatically save your movie when publishing (instead of being prompted to save as is the
case with default settings), select Automatically save when publishing.
• To change the default setting of automatically previewing your movie in a browser after
publishing, deselect Preview after publishing.
Using the DCR and HTML file format
If you create a DCR file and an HTML file with all of the tags necessary to display your DCR
movie, Director does the following:
• Creates a DCR and HTML file in the same directory as your Director (DIR) movie.
Note: Director creates a CCT file for each external cast and, by default, saves the CCT file in the
same folder as the DCR file. To specify a different file location, hold Alt (Windows) or Option
(Macintosh) when you select File > Publish. Continue to hold the key for access to dialog boxes
that let you specify new paths for both your DCR and CCT files.
• Gives both your DCR and HTML files the same name as your DIR file, with the appropriate
extensions (for example, MyMovie.dcr and MyMovie.html).
• Sets the DCR movie’s width and height to match the dimensions of the DIR movie.
• Configures the DCR movie and HTML file so that if your users resize their browsers, the
DCR movie remains the same size as the original DIR movie.
• Compresses bitmap images and sound using JPEG compression. Note that if you’ve
compressed images for individual cast members, those settings will override compression
Publish settings are movie specific; that is, if you change the default Publish settings, Director
saves those changes when you save your movie. A new movie uses the Default Publish settings,
not those set for a specific movie.