
User Guide


292 Chapter 13: Navigation and User Interaction
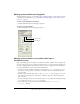
To use basic navigation behaviors:
1 Create a movie that contains a sprite in frame 1 and at least one marker in a later frame.
2 Select Window > Library Palette, and select the Navigation library.
3 Drag Hold on Current Frame to frame 1 in the script channel.
Typically, you use this behavior in a frame that requires user interaction such as selecting a
menu command.
4 Play the movie.
The playhead remains in frame 1 where you attached the behavior. The movie is still playing,
but the playhead remains on the single frame. Use the
Go Next Button behavior to send the
playhead to a new frame and continue playing, as described in the following steps.
5 Stop the movie.
6 Drag the Go Next Button behavior from the Library palette to the sprite in frame 1.
7 Rewind and play the movie again.
The playhead is again stopped in the first frame by the
Hold on Current Frame behavior.
8 Click the sprite to which you attached the Go Next Button behavior.
The playhead jumps to the frame that contains the next marker and continues playing.
Adding push buttons, radio buttons, and check boxes
Director MX provides several built-in user interface elements for quickly adding interactivity to
your movies. These elements include push buttons, radio buttons, and check boxes.
To add a push button, radio button, or check box:
1 Open the Tool palette by selecting Window > Tool Palette, if it’s not already open.
2 Select the Push Button, Radio Button, or Check Box tool in the Tool palette.
3 Click and drag on the Stage to create the selected button type.
4 Type a label in the text area next to the button or check box.
Setting properties for push buttons, radio buttons, and check boxes
When you create a push button, radio button, or check box on the Stage, a Button cast member is
added to the Cast. You can use button cast member properties to change the name and button
type of button cast members.
To view or change button cast member properties:
1 Select a button cast member (a push button, radio button, or check box) and click the Member
tab of the Property inspector using the Graphical view.
2 To view or edit the cast member name, use the Name text box.
3 To specify how Director removes the cast member from memory if memory is low, select an
option from the Unload pop-up menu. For more information, see “Controlling cast member
unloading” on page 47.
4 To change the type of button, click the Button tab and select Push Button, Check Box, or Radio
Button from the Type pop-up menu.
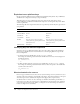
Radio Button
Push Button
Check Box