
User Guide

142 Chapter 6: Vector Shapes
Controlling vector shapes with Lingo or JavaScript syntax
You can use script to modify a vector shape by setting properties and using methods related to the
shape’s vertices. For more information about the following properties, expressions, and methods,
see the Scripting Reference topics in the Director Help Panel.
• To display a list that contains the location of each vertex and control handle in a vector shape,
test the
vertexList property.
• To access a vertex directly, use the vertex chunk expression.
• To add or delete a vertex, use the addVertex() or deleteVertex() method.
• To move a vertex or a vertex handle, use the moveVertex() or moveVertexHandle() method.
• To display the vertex list for a vector shape, test the curve property.
• To add a new shape to the vector shape, use the newCurve() method.
• To display or specify the registration point for the vector shape’s cast member, test or set the
regPointVertex property.
• To display or specify the point around which a vector shape scales and rotates, test or set the
originMode property.
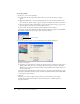
Setting vector shape properties
You can use the Property inspector to view and change settings for selected vector shape cast
members. In addition to setting standard name and unload properties, you can specify anti-
aliasing based on system performance and how the shape fits within the bounding rectangle.
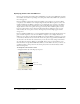
To view or change vector shape cast member properties:
1 Select a vector shape cast member and click the Member tab on the Property inspector.
2 To specify how Director removes the cast member from memory if memory is low, be sure
you’re in Graphical view and select an option from the Unload pop-up menu. For more
information, see “Controlling cast member unloading” on page 47.
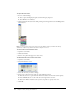
3 To set specific vector shape settings, click the Vector tab.
4 To set the stroke color, choose a color from the Color menu, or enter a color value in the Stroke
Color text box.
5 To set the width of the stroke, use the Width slider.
6 To set the fill color, select a color from the Color menu, or enter a color value in the Fill Color
text box.
7 To set the type of fill, select one of these three options: No Fill, Solid, or Gradient.
8 To change the setting for anti-aliasing, click Anti-alias.
A check mark indicates that Anti-alias is on.