
User Guide


Working with Tables 83
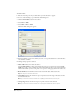
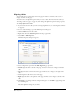
5 Click a button in the Header section to indicate whether you want a header; select from the
following options:
• None indicates no header.
• Left indicates a header column.
• To p indicates a header row.
• Both indicates a header column and a header row.
Tip: Screen readers read headings for rows or columns that have one of these header types applied; they do not
read headings that you create by making text bold and centered.
6 Click OK.
The table appears in your draft.
Tip: After you insert the table, select it, then click the Table button again to change table properties. Also, see
“Setting general preferences” on page 29 for information about a table rendering option which might improve
performance when you’re editing large tables.
Inserting a table within a table
You can insert a table within an existing table on a page.
To insert a table within a table:
1 In your draft, place the insertion point in the table cell where you want the table to appear.
2 Do one of the following to open the Insert Table dialog box:
• Click the Insert Table button in the toolbar.
• Select Insert > Table.
• Select Table > Insert > Table.
The Insert Table dialog box appears.
3 Change options as necessary.
4 Click OK.
The table appears in the table cell where you placed the insertion point.
Selecting table elements
You can select an entire table, row, or column, or you can select a contiguous block of cells within
a table:
• To select an entire table, row, or column, see “Selecting an entire table, row, or column” on
page 84.
• To select a cell, block of cells, or nonadjacent cells, see “Selecting a cell, block of cells, or
nonadjacent cells” on page 84.
After you’ve selected a table or cells, you can modify the appearance of the selection (see
“Modifying table appearance” on page 91) or of the text contained in the selection (see “Cutting
and copying table cells” on page 87).