
User Guide


Chapter 882
To insert a table:
1 Place the insertion point in your draft where you want the table to appear.
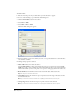
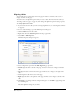
2 Do one of the following to open the Insert Table dialog box:
• Click the Insert Table button in the toolbar.
• Select Insert > Table.
• Select Table > Insert > Table.
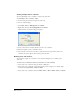
The Insert Table dialog box appears.
3 Enter the number of rows and columns you want, or accept the defaults for a table with three
rows and three columns.
4 Change table properties as desired:
• Tab le width indicates how wide the table is.
Select Default width for a table with columns that resize as you add content. Select Specific
width if you want to enter a number for a fixed table width. Use the pop-up menu to indicate
whether the number you enter is in pixels, or is a percent of the page you want the table to be.
• Border thickness is the thickness of the border around the table and between cells.
Tip: Enter 0 if you do not want a table border.
• Cell padding indicates the amount of space, in pixels, between the edge of the table cell and
the content of the cell.
Note: If you do not enter a value, Contribute sets cell padding to the default value, which is 1 pixel.
• Cell spacing indicates the amount of space, in pixels, between each table cell.
Note: If you do not enter a value, Contribute sets cell spacing to the default value, which is 3 pixels.