
User Guide

Chapter 14162
Editing website connections
You can edit the connection information for any Contribute website. This allows you to modify a
connection if any of its parameters change (for example, if you move a website to a different
network location or change its URL).
In an imported connection, the only pieces of connection information you can edit are your
name and your e-mail address.
Tip: If you have drafts open, you can’t change your name or e-mail address for the website those drafts are part of.
To change that information, first close the open drafts.
To edit a website connection:
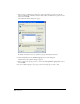
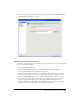
1 Choose Edit > My Connections.
The My Connections dialog box appears.
2 Select a website from the list of connections.
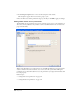
3 Click the Edit button.
The Connection Wizard appears.
4 Navigate through the Connection Wizard using the Next button and modify the necessary
website connections settings.
For more information on the Connection Wizard website settings, see “Creating a Contribute
website connection” on page 143.
5 When you have modified the necessary connection settings, and verified that they are
correct, you will need to send a connection file to users containing the new connection
setting information.
For more information on sending a connection file to users, see Chapter 16, “Sharing Website
Connections,” on page 181.
Renaming a website
You can rename a website as it appears in Contribute. The name you choose will appear in the
Home Pages menu, the My Connections dialog box, and the Administer Websites submenu.
To rename a website as it appears in Contribute:
1 Choose Edit > My Connections.
The My Connections dialog box appears.
2 Select the website connection you want to edit from the list of connections.
3 Click the Rename button.
The website name is highlighted by an editing box.
4 Click inside the editing box and enter a new name for the website.
5 Press Enter to apply your changes.
6 Click Close to save your changes and close the My Connections dialog box.