CONTRIBUTE 3 Deploying Contribute and Contribute Publishing Server
Trademarks 1 Step RoboPDF, ActiveEdit, ActiveTest, Authorware, Blue Sky Software, Blue Sky, Breeze, Breezo, Captivate, Central, ColdFusion, Contribute, Database Explorer, Director, Dreamweaver, Fireworks, Flash, FlashCast, FlashHelp, Flash Lite, FlashPaper, Flash Video Encoder, Flex, Flex Builder, Fontographer, FreeHand, Generator, HomeSite, JRun, MacRecorder, Macromedia, MXML, RoboEngine, RoboHelp, RoboInfo, RoboPDF, Roundtrip, Roundtrip HTML, Shockwave, SoundEdit, Studio MX, UltraDev, and WebHelp are eith
Contents Chapter 1: Overview . . . . . . . . . . . . . . . . . . . . . . . . . . . . . . . . . . . . . . 5 Chapter 2: Preparing Your Network and Installing Contribute . . 17 Chapter 3: Configuring Contribute and Contribute Publishing Server to work with your website. . . . . . . . . . . . . . . . . . . . . . . . . . .
Contents
CHAPTER 1 Overview Macromedia Contribute is a website editor that lets people connect to departmental and other websites so that they can update web page content. Administrative assistants, product managers, human resource managers, and other people in an organization can use Contribute to update their team website without having to contact a web team or other departmental resources. For larger organizations, you can optionally use Macromedia Contribute Publishing Server (CPS) with Contribute.
This user model works best for smaller workgroups and organizations. It allows you to quickly set up Contribute, create a connection to your website, define the necessary user roles, generate connection information for the website connection/user role, and send it to users in the form of a connection key file.
Consider a large organization with several decentralized websites. In addition to a public facing site that provides information about the organization, there are several internal sites in use by individual departments and workgroups. The organization uses LDAP as both a directory service that lets users look up other employees as well as an authentication service through which administrators set permissions limiting users’ access to file-sharing servers and other network resources.
Likewise, web designer Laura Logic and Contribute administrator Jah Wobble have access to all sites. As the web designer, Laura provides templates that are easy to add content to and that fit the needs of users collaborating internally. The templates she maintains include those for taking meeting minutes, for scheduling, and for providing product specifications, marketing launch plans, and sales projections, to name a few.
CPS integrates with the organization’s LDAP service, which authenticates user access to various network resources. In this case, the LDAP authentication is the first step in granting access to websites hosted on various servers within the organization. The Contribute roles further define user privileges within a website, determining the degree to which users can modify pages within the site.
The key to this arrangement is that all users have the same Contribute site connection. In other words, there is a single connection point for all users that controls the behavior of Contribute when editing the website. If you want to restrict users to editing content in their workgroup’s folder, you would need to create a role that limits access to a specific folder.
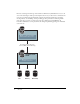
Deploying Contribute for multiple websites on one webserver In this scenario, there are several departmental intranet sites, each of which needs access restricted to members of the given department. To accomplish this, the administrator creates a separate Contribute connection for each department’s folder within the website (to essentially create subsites). In addition, each department has its own set of Dreamweaver templates on which to base new pages.
Users can browse the entire site but are restricted to editing within their department’s folder. By restricting user’s editing privileges to their department’s web pages, each group can maintain control over their web content and can act more independently with the content they make available to the entire organization. A potential drawback to this arrangement is that users in different departments cannot collaborate on pages. Each department must work independently.
In regard to Contribute, the use of a staging server lets you copy only folders and files that you specify as necessary for your website. This enables you to use Contribute to update web content on the staging server, but only publish the necessary web pages to your production web server for public access. By configuring Contribute to work with content on your staging server, you can provide an extra measure of security by not copying Contribute’s administrative files and folders to your production server.
To use Contribute with a staging server, you create a connection to the staging server’s website. Users can update content on the staging server. Any temporary drafts that are created during the review process, or drafts of files that are in the process of being updated, but not yet published to the website, remain on the staging server, protected by your network’s firewall.
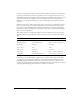
The following table describes the function of each role that relates to Contribute: Role Function Contribute administrator Responsible for installing Contribute, setting up user roles and privileges, and determining the degree to which users can access and update websites. Contribute administrators are often members of an organization’s IT staff, responsible for maintaining server and network infrastructure, managing user and file permissions across an organization’s network.
Task Description Install Contribute CPS is a suite of Java server applications that lets you integrate Publishing Server (CPS) Contribute with Lightweight Directory Access Protocol (LDAP) or Active (optional) Directory services, and implement e-mail notifications to keep Contribute users informed about the status of their drafts in progress. To use CPS, you must install and configure the server on a Java application server.
CHAPTER 2 Preparing Your Network and Installing Contribute Once you have given some consideration to what is involvement in deploying Macromedia Contribute and Contribute Publishing Server (CPS), you are ready to begin. First you need to prepare your network, then you can install the software.
• Roles you define within Contribute Network permissions can be set in several ways through a variety of systems. Contribute always adheres to the network permissions for read and write access to folders. It also obeys permissions set through LDAP and similar systems. Contribute can never overwrite any server- or networklevel permissions. Note: The server’s network and operating system permissions, and the web server software’s permissions, always take precedence over Contribute permissions.
Restricting access to administrative folders and special file types When you create a site connection, Contribute creates special files that are stored in folders whose names begin with an underscore (such as _mm, _baks, and _notes). These folders may contain files with user names, e-mail addresses, previous versions of web pages, and other types of meta information used by Contribute.
In addition to securing the administrative folders using the operating system’s permissions and access control lists, you should consider using UrlScan to further secure IIS web servers. UrlScan is a security tool provided by Microsoft that screens incoming requests to the server by filtering the requests based on rules that you create. Filtering requests helps secure the server by ensuring that only valid requests are processed. To learn more about the UrlScan utility, see the Microsoft website at www.
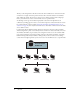
The following figure shows an example of a file sent for review, and the files and folders that are created when you send a user of your website a page for review. _mm ct3 messaging users WIPMetaData jlydon@acme.com index.html index.html wipMeta.mje1d0lzk4vxc.fre notifyWIP.jr615v2v4p.csi wipMeta.mje1d0lzk4vxc.csi.chk wipMetamje1d0lzk4vxc.csi MMWIP index.html users _notes 3629c837.htm.
This figure shows the main folders and files that are created when you enable the draft review process for a given site and a user sends a page for review. The following folders are created: _mm/ct2004/messaging/users contains a folder for each user for whom the draft review process is enabled. Each user folder is populated with a series of XML files that identify what drafts the user has within the system. In the previous example, the file notifyWIP.jr615v2v4p.
Understanding Contribute connection paths A Contribute website is defined when you create an administrative connection and select the website folder to connect to. All folders from the folder you connect to and below make up the the Contribute site. As the administrator, you can establish a connection to the root folder in a website if you need access to all the folders in that site. Or, you can establish a connection to a lower-level folder, depending on the access you and your users require.
Child websites do not inherit from the parent website. This includes administrative settings, roles, templates, and other assets. Each website connection is its own distinct website and is not related to any other website connections you create. When you have website connections that overlap, the most nested website that contains the page a user is editing or viewing takes priority for administrative settings and roles, the draft review process, and templates and other assets.
Understanding the draft for review process in overlapping websites When you send drafts for review, your list of possible reviewers are users who are connected to your website. And the draft you send for review is temporarily placed in the root of your website (that is, the root of your Contribute website connection). Tip: To avoid potential problems with the draft review process, users who are connected to websites that have child websites, should also connect to all the child websites.
Suppose User 1 edits a page in the marketing folder and sends it to User 2 for review. The draft for review is temporarily placed on the website at the root of User 1’s website connection (www.mysite.com/intranet/). (Remember, User 1 does not have a website connection to the marketing website.) When User 2 receives the draft, there is a conflict because User 2 has website connections to the site where the draft for review was placed and also to the website that contains the original page.
Local area networks When Contribute is used to connect to a web server through a local network, the web server must be visible to the local network. Contribute can also be used with virtual private network (VPN) servers to ensure that all file transmissions occur behind your firewall. If the web server is not visible to the local network, you can create an FTP connection with Contribute to work with the website (if the server you’re creating a connection to has an FTP server installed).
Standard FTP sends the user ID and password as clear (that is, unencrypted) text, allowing anyone monitoring your FTP data to see your user ID and password, as well the data being transmitted. With SFTP, everything you transmit is encrypted, protecting it from monitoring by intruders. In addition to increased security, Macromedia recommends using SFTP because it’s a more robust protocol that provides more reliable performance.
WebDAV Web-based Distributed Authoring and Versioning (WebDAV) is a series of extensions to the HTTP protocol that lets users collaboratively update and manage files on a website. A key feature of the WebDAV protocol is file locking. Users connecting to a WebDAV-enabled site lock files when they open the file for editing. This prevents a user of the same website from overwriting another user’s changes.
Network paths and web addresses (URLs) When creating a connection to the website, Contribute prompts you to provide the web address (URL) of the website, and the network connection information of the server and folder storing the website. Both the web address and network path must point to the same folder in the website. For example, suppose your website is located at the directory path: \\MyServer\wwwroot\sites\MySite And the corresponding web address for this site is: www.MyServer.
• Web address (URL) of the website A website’s Uniform Resource Locator (URL) is its address either on the Internet or on an organization’s intranet. Website URLs usually have the following form: http://www.mysite.com/ • Network path to the website (for connecting to local networks) The network path is the location of the website within your organization’s local network.
3. Click Create. The Connection Wizard (Windows) or Connection Assistant (Macintosh) appears. This wizard or assistant guides you through setting up a new website connection. As you complete each screen in the wizard or assistant, click Next (Windows) or Continue (Macintosh) to go to the next screen. Tip: Click Back or Go Back to return to a previous screen, if necessary. If you need more information about how to complete a screen, click the Help button. 4.
Install CPS on its own server within a firewall-protected network. When using the User Directory service, CPS stores information to authenticate user access to web servers within your IT environment. For this reason, you should follow security procedures appropriate to any other application server you might install within your infrastructure. For a list of the minimum hardware and software configurations required to successfully operate CPS, see www.macromedia.com/go/sysreq_cps.
10. Enter the password you created during the installation process. The CPS Console appears for you to configure CPS. For information, see “Configuring Contribute Publishing Server (CPS only)” on page 54. Tip: In the future, you can access the CPS Console by selecting Start > Programs > Macromedia Contribute Publishing Server > Administer Macromedia Contribute Publishing Server. To install CPS by using the Simple Installation (UNIX): 1. Download the installation file. 2.
Installing Contribute Publishing Server using the WAR File Installation Use the WAR File Installation for CPS if your computer is already running a J2EE application server or if there is not a Simple Installation installer for your platform. Note: If there is not an installer for your platform, and you need to perform the WAR File Installation but do not have a Java application server, you can download a trial version of the JRun 4 server with limited licensing capabilities.
To use the CPS installer to generate a WAR file (UNIX): 1. Download the installation file. 2. At a command prompt, enter the following command to set execute permissions for the JRun installation shell script: chmod +x pubserver-linux.bin Note: If you installing on the Solaris platform, substitute solaris for linux in the command. 3. Enter the following command to run the JRun installation script: sh ./pubserver-linux.
• Expand the WAR file and deploy the expanded structure as the working directory. On other application servers (such as JRun 4, BEA WebLogic, and JBoss), you expand the WAR file manually and then deploy the expanded directory structure, which becomes your working directory.
9. Click Deploy. The working directory is deployed in JRun, and the J2EE Components Summary screen appears. Note: In the General Settings section, confirm that the Context Path is set to /contribute. 10. Click the Logging icon in the left pane. The Log Viewer appears. Review the log to make sure that the server started correctly. 11.
6. Change the path value for to indicate the folder created in step 3to store user and connection information. The following example changes the database folder path to: /Contribute Publishing Server/database. Note: If you already added user and connection information in CPS, you need to move that information from the current location to the new location you set.
4. Change the path value for to indicate where you want to store CPS error and output logs. For example: C:\Contribute Publishing Server\logs\out.log C:\Contribute Publishing Server\err.log 5. Save and close ckm.xml, and then restart your J2EE server. 6. Now you are ready to log in to the CPS Console and configure CPS. For information, see “Configuring Contribute Publishing Server (CPS only)” on page 54.
CHAPTER 3 Configuring Contribute and Contribute Publishing Server to work with your website Once you have installed Contribute and connected to your website (see Chapter 2, “Preparing Your Network and Installing Contribute”), you are ready to configure Contribute and Contribute Publishing Server (CPS) to meet your needs. If you are using CPS, you need to enable your website to work with the server and add users to the server.
About Contribute administrative settings Contribute administrative settings are a collection of settings that apply to all users of your website. These settings let you fine-tune Contribute to provide a better user experience. The Contribute administrative settings are as follows: Users and Roles lets you add users to the site, and create, edit, and delete roles. Administration lets you specify a primary administrator for the site, set an administrator password, and remove administration.
Configuring Contribute administrative settings The Administer Website dialog box lets you configure a variety of settings that specify how Contribute interacts with your website as well as letting you manage users. You can set settings that affect the whole website, such as the administrator’s contact or password information, the number of rollback versions of pages to save, and filename conventions for website default home pages.
About Contribute user roles and settings Contribute lets you control access to your website by creating roles. Roles are collections of settings that you create, each of which may be assigned privileges by the administrator of the site. The roles you create reflect different levels of access to page creation, editing and deletion of content, page design, and approval. You can define any number of Contribute roles and specify various options for each role you create.
Folder/File Access limits a role’s access to the selected folder (or folders) and any subfolders they contain. For more information, see “Setting folder and file access settings” in Macromedia Contribute Help. Editing lets you specify what content users can modify and determine how Contribute processes paragraphs, line spacing, and accessibility options. For more information, see “Setting pageediting and paragraph settings” in Macromedia Contribute Help.
The following table describes the roles and privileges related to Contribute. Job Title Contribute Role Privileges System administrator Administrator Installs Contribute, creates connections to the website, and defines Contribute roles appropriate to the magazine’s job functions. The system administrator consults the designer on how to set up role settings so that other members of the magazine’s staff have appropriate editing privileges within their area.
2. Select Users and Roles. By default, Contribute creates three roles: Administrator, Publisher, and Writer. 3. Click Create New Role. The Create New Role dialog box appears. 4. Select an existing role from the Create new role from copy of list box. Selecting an existing role as a base for a new role lets you reuse the selected role’s settings. You can modify the new role’s settings as needed. 5. Enter a name for the role you want to create, and then click OK.
6. Select the role name, and then click Edit Role Settings. The Edit Role dialog box appears. The Edit Role dialog box lets you modify the user settings associated with each role. 7. Modify the settings for the role. For more information about the settings, see “Settings for user roles” on page 50 8. When you finish defining the role, click OK to save your changes. The Role dialog box closes, returning you to the Administer Website dialog box. 9.
Understanding Contribute user authentication models Contribute provides two user authentication models that you can use: File-based authentication lets you use either a password stored in an XML file, or Windows domain authentication. When using the Contribute file-based authentication system, CPS looks up the user’s credentials in an XML file located on the server. When using Windows domain authentication, CPS validates the user’s identity against the Windows domain in which CPS operates.
User branch with baseDN:ou=Central,o=MyCompany, Search Scope:SUBTREE_LEVEL, filter:(objectClass=organizationalPerson) User branch with baseDN:ou=West,o=MyCompany, Search Scope:SUBTREE_LEVEL, filter:(objectClass=organizationalPerson) Group branch with baseDN:ou=Central,o=MyCompany, Search Scope:SUBTREE_LEVEL, filter:(objectClass=groupOfNames) Group branch with baseDN:ou=West,o=MyCompany, Search Scope:SUBTREE_LEVEL, filter:(objectClass=groupOfNames) LDAP permissions and Contribute permissions Integrating your
• Windows domain uses your organization’s Microsoft Windows authentication solution. If you use this method, the User IDs in your LDAP directory must match your Windows user IDs. Authentication workflow When a user attempts to connect to a CPS-managed website through Contribute, the process through which CPS communicates with your organization’s LDAP or other user directory service is as follows: 1. Contribute prompts the user for their user directory authentication credentials. 2.
7. If the user successfully authenticates access to a website, they can edit the website by using Contribute. Configuring CPS User Directory and other services You should configure CPS User Directory services when you deploy CPS. You can also configure the E-mail Notification and Log services at the same time, or you can wait until later. Note: For more information about configuring the other CPS services, see Chapter 1, “Using Contribute Publishing Server” in Macromedia Contribute Publishing Server Help.
To configure Contribute Publishing Server: 1. In a web browser, enter the URL for the CPS Console. Note: The CPS Console requires that you have Flash Player 7 installed on your computer. The URL is https://hostname:port/contribute/admin/server.cfm, and uses the following variables: hostname is the server computer’s DNS name or IP address. port is the network port number that CPS uses. If you used the Simple Installation, the port number is 8900.
3. Enter the CPS administrator password you created during the installation process, and then click Login to log in to the CPS Console. The CPS Console appears. Make a note of the CPS Console web address that appears at the top of the Overview panel; you’ll need this address later when you enable CPS in Contribute. 4. Select User Directory from the Services Settings list on the left. At this point, you should configure the User Directory.
Note: Before you set up LDAPS, you should have already configured the User Directory service to integrate with your LDAP/Active Directory server. If you have not done so, see “Configuring CPS User Directory and other services” on page 58 before you complete the LDAPS procedure in this section. This section describes one method for configuring the User Directory service to use LDAPS. This method uses the Java keytool to import your LDAP server SSL certificate into the trust store of the CPS J2EE server JVM.
4. Click Enable Publishing Server. The Enable Publishing Server dialog box appears. 5. Enter the Publishing Server web address in the address field and deselect the Enable User Directory check box if you will not use the User Directory service to manage users. Note: If you plan to use the User Directory service to manage users, see “Adding users to your website (CPS only)” on page 63 to learn how to add users to your website.
9. Verify that you want the Log and E-mail Notification services enabled. By default, the Log and E-mail Notification services are enabled. To disable one or more of these services, deselect the appropriate check box, and click Save Settings. Now Contribute is enabled to use Contribute Publishing Server and you are ready to add users to your website.
3. Click Add Users. The Add Users dialog box appears. 4. Select a role to assign users from the Role for the new users pop-up menu. The role you assign determines the users’ editing permissions for modifying the site’s pages. 5. Add users to the role you selected. The Search Results panel lets you locate users in your organization’s user directory and add them to the list of users for the role you’ve selected.
7. Click OK to close the Add Users dialog box. The Users and Roles panel of the Administer Website dialog box shows the new users who are assigned to a specific role. 8. To add additional users, repeat steps 4 through 8. Tip: For more information on creating user roles, see “About Contribute user roles and settings” on page 50. Now you are ready for user to install Contribute and connect to the website.
After receiving a connection key, a user simply double-clicks it to start the connection process. Because the file is encrypted, the user must know the password that the administrator defined for the key. Connection keys also specify what role settings to apply. When the user supplies the correct password, Contribute automatically makes a connection to the site and allows page edits as defined for the associated Contribute role.
To create a website connection key to share with users: 1. Select Edit > Administer Websites (Windows) or Contribute > Administer Websites (Macintosh), and select the website you want to administer from the submenu. 2. Do one of the following: If the website has no administrator, click Yes when a dialog box asks whether you want to become the website administrator. Then enter and confirm an administrator password for the website, and click OK. The Administer Website dialog box appears. 3.
4. You can send a connection key file to a new user, or you can send a connection key to a user who has already connected to the site, and assign them a new role. ■ To send a connection key to a new user, click Send Connection Key. ■ To send a connection key to an existing user, assigning them a new role, select the user’s name from the list of connected users, and click Send Connection Key. The Send Connection Key Wizard (Windows) or Export Connection Key Assistant (Macintosh) appears. 5.
Note: Before users can use a connection key or type connect: to connect to a CPS managed website, you must add users to the website. If you haven’t already done so, see “Adding users to your website (CPS only)” on page 63. If you’re not using CPS to manage your website, see “Sending connection keys for websites” on page 66 for information about sending connection keys. To send a CPS connection key: 1.
70 Configuring Contribute and Contribute Publishing Server to work with your website
Index A Add Users dialog box 58 Administer Website dialog box 55, 57 administration settings, about 42 sitewide settings 43 administrator responsibilities 14 C child website 23 compressed WAR archive 36 connecting to a website managed by CPS 60, 62 connection key sending 59 Connection Wizard 30 connections about 26 child websites 23 creating a website 30 network path 31 overlapping 23 SFTP 27 URL 31 WebDAV 29 Contribute 58 Administer Website dialog box 55, 57 Enable Publishing Server dialog box 56 Log serv
L S LDAP using secure LDAP with User Directory 54 Log service, about 6 secure LDAP, using with User Directory 54 server permissions 18 services E-mail Notification 6 Log 6 User Directory 6 SFTP connection information 27, 31 Simple Installation Contribute Publishing Server 32, 33 Sitewide Settings dialog box 43 staging servers case study 12 system requirements 32 N network about 18 connection types, about 26 path and web addresses 30 O overlapping, website connections 23 overview CPS 6 P parent website