
User Guide

94 Chapter 7: Working with Images and Graphical Elements
Using the Insert menu or Image button to add images to a page
You can use the Insert menu or Image button in the toolbar to add an image from your computer
or website to a page.
You can add images from other sources by dragging them to the page (see “Dragging images to a
page” on page 95) or by copying and pasting them on the page (see “Copying and pasting
images” on page 95).
To add an image using the Insert menu or Image button:
1.
Place the insertion point in your draft where you want the image to appear.
2.
Do one of the following:
■ Click the Image button in the toolbar.
■ Select Insert > Image.
3.
Select one of the following options from the pop-up menu:
■ From My Computer
■ From Website
■ From Shared Assets
Note: If your Contribute administrator has restricted the types of images your user role can insert,
you might be able to insert images only from shared assets.
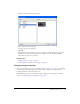
The Select Image, Choose Image on Website, or Insert Shared Asset dialog box appears.
Tip: If you have already inserted an image in a page in a Contribute website, and you want to reuse
the image, select From Website.
4.
Browse to and select the image, and then click the Select or OK button.
5.
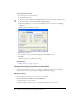
If the Image Description dialog box appears, enter text to describe the image for users with
disabilities or for users whose browsers are set to display text only, and then click OK.
The image appears in your draft. To make the image web-ready, Contribute reduces large
images to the size pre-set by the Contribute administrator, if the administrator has enabled
image processing for your role.
Note: If the image you are inserting is from your computer, you can edit the image inline (if your
user role has permission to edit inline), but you can’t edit the image in an external application until
you publish the draft. For more information about editing, see “Editing an image in Contribute”
on page 100.
Tip: After you insert the image, double click the image to change image properties. For more
information, see “Changing image properties” on page 97.
Related topics
• “Copying and pasting images” on page 95