
User Guide


170 Chapter 12: Creating and Managing Website Connections
To create a new website connection:
1.
Start Contribute.
2.
Select Edit > My Connections (Windows) or Contribute > My Connections (Macintosh).
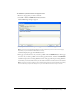
The My Connections dialog box appears. The options in this dialog box let you create and
manage your Contribute connections.
3.
Click Create.
The Connection Wizard (Windows) or Connection Assistant (Macintosh) appears.
This wizard or assistant guides you through setting up a new website connection. As you
complete each screen in the wizard or assistant, click Next (Windows) or Continue
(Macintosh) to go to the next screen.
Tip: Click Back or Go Back to return to a previous screen, if necessary. If you need more
information about how to complete a screen, click the Help button.
4.
On the Summary screen, review the connection settings to verify that they’re correct and click
Done (Windows) or Finish (Macintosh) to complete the connection.
Contribute creates a connection to the website.
After Contribute has successfully created a connection to the website, the Connection Wizard
or Assistant closes, and the main page of the website appears in the Contribute browser.
Related topics
• “Enabling and Disabling CPS for a website” on page 171
• “Managing website connections” on page 190
Creating a connection to a .Mac account
You can use Contribute with your .Mac account and seamlessly set up a connection to your
website. This integration of Contribute and .Mac is available on Mac OS X 10.2 and later.
Note: On 10.1.X, you need to mount your iDisk so that Contribute can detect your .Mac account. To
mount your iDisk, in the Finder, select Go > iDisk.
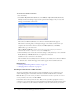
If Contribute detects that you have an active .Mac account, you will be prompted to create a
connection to your account when you start Contribute. If you dismiss the prompt, and later want
to create a connection, use the Connection Assistant to create the connection to your account.