
User Guide

Selecting table elements 113
3.
Complete the dialog box.
For information about options in the dialog box, click the Help button.
4.
Click OK.
The table appears in your draft.
Tip: After you insert the table, select it, and then click the Table button again to change table
properties. For information about changing header properties, see “Modifying row or column
properties” on page 123.
To insert a table within a table:
1.
In your draft, place the insertion point in the table cell where you want the table to appear.
2.
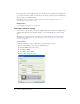
Do one of the following to open the Insert Table dialog box:
■ Click the Ta bl e button in the toolbar.
■ Select Insert > Table.
■ Select Table > Insert > Table.
The Insert Table dialog box appears.
3.
Change options as necessary.
4.
Click OK.
The table appears in the table cell where you placed the insertion point.
Related topics
• “Selecting table elements” on page 113
• “Resizing tables, rows, and columns” on page 115
• “Adding, deleting, and merging table rows and columns” on page 119
• “Modifying table appearance” on page 121
Selecting table elements
You can select an entire table, row, or column, or you can select a single cell or a contiguous block
of cells within a table.
Related topics
• “Modifying table appearance” on page 121
• “Cutting and copying table cells” on page 117
Selecting an entire table, row, or column
You might select an entire table, row, or column because you want to paste it onto another page
(see “Cutting and copying table cells” on page 117) or because you want to change the
background of all the cells in the selection at once (see “Modifying table appearance”
on page 121).