DEPLOYING CONTRIBUTE AND CONTRIBUTE PUBLISHING SERVER
© 2007 Adobe Systems Incorporated. All rights reserved. Adobe® Contribute® CS3 Deploying Contribute and Contribute Publishing Server If this guide is distributed with software that includes an end-user agreement, this guide, as well as the software described in it, is furnished under license and may be used or copied only in accordance with the terms of such license.
iii Contents Chapter 1: Overview Understanding Contribute user management models Common website configurations Deployment roles and responsibilities Deployment tasks checklist ...................................... 1 .......................................................... 4 ..................................................... 8 ............................................................... 9 Chapter 2: Setting up your Contribute Server Environment Preparing your web server before you deploy . . .
1 Chapter 1: Overview Adobe® Contribute® CS3 is a website editor that lets people connect to departmental and other websites so that they can update web page content. Administrative assistants, product managers, human resource managers, and other people in an organization can use Contribute to update their team website without having to contact a web team or other departmental resources. For larger organizations, you can optionally use Adobe® Contribute® Publishing Server (CPS) with Contribute.
ADOBE CONTRIBUTE CS3 2 User Guide To use CPS, you must have a J2EE application server such as Adobe® JRun™ 4 installed. To learn about other CPS functionality, see “Using Contribute Publishing Server with Contribute” on page 2. For more information about getting CPS for your organization, see the CPS website at www.adobe.com/products/contribute/server/.
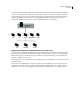
ADOBE CONTRIBUTE CS3 3 User Guide Although this user list is oversimplified, it demonstrates one possible scenario for the way that users within an organization might be assigned access to websites. This scenario divides users according to their role within the organization, and assumes that they have full editing and publishing privileges in their respective sites. Certain users have access to all the sites.
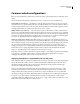
ADOBE CONTRIBUTE CS3 4 User Guide Common website configurations Before you deploy Contribute, consider various scenarios for setting up Contribute for large or multi-team organizations. This section describes three primary configurations for you to consider as you set up a Contribute site.
ADOBE CONTRIBUTE CS3 5 User Guide It is important that the Templates folder, which is located at the same level as the Contribute shared settings folder (_mm), is accessible by all users, and the site’s CSS (CSS folder), and server side includes (SSI folder) are protected by role settings that restrict access to those folders. Web pages and associated files stored in these folders cannot be edited using Contribute, preventing them from being inadvertently modified or damaged.
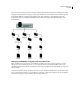
ADOBE CONTRIBUTE CS3 6 User Guide Users can browse the entire site but are restricted to editing in their department’s folder. By restricting user’s editing privileges to their department’s web pages, each group can maintain control over their web content and can act more independently with the content they make available to the entire organization. A potential drawback to this arrangement is that users in different departments cannot collaborate on pages. Each department must work independently.
ADOBE CONTRIBUTE CS3 7 User Guide By configuring Contribute to work with content on your staging server, you can provide an extra measure of security by not copying Contribute’s administrative files and folders to your production server. This also lets you eliminate the presence of unnecessary files from a server with public access. To use Contribute with a staging server, you create a connection to the staging server’s website. Users can update content on the staging server.
ADOBE CONTRIBUTE CS3 8 User Guide Deployment roles and responsibilities After you understand how Contribute fits into your organization, it’s important to understand the various roles involved in deploying Contribute. As a system or website administrator, you play a large part in deploying Contribute. The deployment responsibilities include the following tasks (for a complete list, see “Deployment tasks checklist” on page 9): • Installing the Contribute software.
ADOBE CONTRIBUTE CS3 9 User Guide Deployment tasks checklist The following table describes the tasks you need to perform to successfully deploy Contribute. Task Description Configure network and server permissions Ensure that the network and server permissions allow read, write, and modify access so that Contribute users can connect to the site and update pages. For more information, see “Preparing your web server before you deploy” on page 11.
ADOBE CONTRIBUTE CS3 10 User Guide Task Description Enable your website to work with CPS (optional) If you use CPS, you must enable your website to work with the server. Add users to the website In Contribute, add users to the website. For more information, see “Enabling Contribute websites to work with CPS (CPS only)” on page 42. For more information, see “Adding users to your website (CPS only)” on page 44.
11 Chapter 2: Setting up your Contribute Server Environment After you have given some consideration to what is involved in deploying Adobe® Contribute® and Contribute Publishing Server (CPS), you are ready to begin. First you need to prepare your network, then you can install the software.
ADOBE CONTRIBUTE CS3 12 User Guide Understanding server access for connecting to CPS-managed websites As an administrator, you should require that users enter their own account username and password to log in when they use FTP, SFTP, or WebDAV to connect to a website managed by CPS. This is a best practice and the default option. The alternative is to use a shared FTP, SFTP, or WebDAV account for a website connection managed by CPS.
ADOBE CONTRIBUTE CS3 13 User Guide If you’re not sure how to edit the Apache httpd.conf file or don’t have permission to do so, ask your system administrator or Internet service provider (ISP) to do it for you. To learn more about limiting access to files and folders, and other security issues relevant to the Apache web server, see the documentation supplied with your Apache distribution.
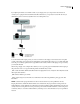
ADOBE CONTRIBUTE CS3 14 User Guide The following figure shows an example of a file sent for review, and the files and folders that are created when you send a user of your website a page for review. This figure shows the main folders and files that are created when you enable the draft review process for a given site and a user sends a page for review. The following folders are created: _mm/ct2004/messaging/users contains a folder for each user for whom the draft review process is enabled.
ADOBE CONTRIBUTE CS3 15 User Guide WIPMetaData contains a series of files that maintain the draft history and the current state and location of the draft in the draft review process. The files contained in this folder include an XML file (wipMeta.mje1d0lzk4vxc.csi in this example) that serves as a pointer to files in the draft review process and also include contact information for the sender and recipient of the draft. A corresponding file with the extension .
ADOBE CONTRIBUTE CS3 16 User Guide • connection2: www.mysite.com/intranet/marketing In this case, the connection paths overlap, and the second connection is a child website of the first connection, which is the parent website. Adobe recommends that, if you create child sites, you make any users who are connected to a parent site, also connect to any child sites.
ADOBE CONTRIBUTE CS3 17 User Guide A page in the marketing folder, marketinganalysis.htm for example, is technically part of both websites that user is connected to. But because these are two separate connections—and therefore two separate websites—there are two different administrative folders. When the user edits the marketinganalysis.htm file, the roles and settings for the most nested website connection applies; in this example, www.mysite.com/intranet/marketing.
ADOBE CONTRIBUTE CS3 18 User Guide • User 1’s connection: www.mysite.com/intranet/ • User 2’s connections: www.mysite.com/intranet/ and www.mysite.com/intranet/marketing Suppose User 1 edits a page in the marketing folder and sends it to User 2 for review. The draft for review is temporarily placed on the website at the root of User 1’s website connection (www.mysite.com/intranet/). (Remember, User 1 does not have a website connection to the marketing website.
ADOBE CONTRIBUTE CS3 19 User Guide File transfer protocol (FTP) If users access the website by using FTP, ensure that the folder has delete, overwrite, and rename privileges enabled. When anonymous FTP is used, these options are typically disabled by default so that users cannot update pages or add new pages to the website. If you will use FTP to connect to a website, Adobe recommends that you use SFTP.
ADOBE CONTRIBUTE CS3 20 User Guide FTP and SFTP file permissions Typically, FTP servers are configured so that when they create (or write) a new file, the permissions created for the file give the person uploading the file read/write permission and give members in the permission group read-only access. In the case of Contribute, this process can cause a problem when another user tries to edit a page.
ADOBE CONTRIBUTE CS3 21 User Guide • Send a connection key that allows only users connecting to the site to use WebDAV. • Restrict local area network, FTP, and SFTP access to the server hosting the WebDAV-enabled site. For more information on WebDAV, see the WebDav Resources website at www.webdav.org.
ADOBE CONTRIBUTE CS3 22 User Guide If you have multiple copies of Contribute, use a different user name for each copy. For example, Chris(laptop), and Chris(Mac). Using the same user name can cause problems because you can override checkouts you make on the other computer. 2 Web address (URL) of the website A website’s Uniform Resource Locator (URL) is its address either on the Internet or on an organization’s intranet. Website URLs usually have the following form: http://www.mysite.
ADOBE CONTRIBUTE CS3 23 User Guide This wizard or assistant guides you through setting up a new website connection. As you complete each screen in the wizard or assistant, click Next (Windows) or Continue (Macintosh) to go to the next screen. Click Back or Go Back to return to a previous screen, if necessary. If you need more information about how to complete a screen, click the Help button.
ADOBE CONTRIBUTE CS3 24 User Guide To install CPS by using the Simple Installation (Windows): 1 Download the installation file. 2 Double-click the file to start the installer. 3 Read and accept the license agreement to continue with the installation. 4 In the Installation Method screen, select the Simple Installation option. 5 Accept the default installation location or click Choose to select another location.
ADOBE CONTRIBUTE CS3 25 User Guide Note: If you are installing on the Solaris platform, substitute solaris for linux in the command. The installer extracts the installation files, and then runs the install script. 4 View each screen of the license agreement, and then accept the agreement to continue with the installation. 5 In the Installation Method screen, select the Simple Installation option. 6 In the Installation Folder screen accept the default installation location or enter another location.
ADOBE CONTRIBUTE CS3 26 User Guide To use the CPS installer to generate a WAR file (Windows): 1 Download the installer. 2 Double-click the file to start the installer. 3 Read and accept the license agreement to continue with the installation. 4 In the Installation Method window, select the WAR file option. 5 Accept the default installation location or click Choose to select another location.
ADOBE CONTRIBUTE CS3 27 User Guide Note: CPS requires that your J2EE application server be running version 1.4 or later of the JVM (Java Virtual Machine). The CPS application must run from an expanded directory structure. J2EE application servers vary in how you deploy the WAR file and create the expanded directory structure. Typically, there are two methods: 1 Deploy the compressed WAR file to a working directory.
ADOBE CONTRIBUTE CS3 28 User Guide 8 Navigate to the working directory you created (pubserver-war) by clicking Browse, or by entering the path in the Source File Path text field. 9 Click Deploy. The working directory is deployed in JRun, and the J2EE Components Summary screen appears. Note: In the General Settings section, confirm that the Context Path is set to /contribute. 10 Click the Logging icon in the left pane. The Log Viewer appears.
ADOBE CONTRIBUTE CS3 29 User Guide 4 Create the database.xml file in the database folder. If you are using a file-based user directory, ensure that the user_directory.xml file is also in the database folder. By default, the contents of the user_directory.xml file will look like this: 5 At the command prompt, change to the WEB-INF/config folder in your CPS working directory. 6 Open the ckm.xml file in a text editor.
ADOBE CONTRIBUTE CS3 30 User Guide Configuring the CPS file locations CPS stores user and connection information, along with logs, to your local file system, and indicate where those files are stored. To configure the WAR file: 1 At the command prompt, change to the WEB-INF\config folder in your CPS working directory. 2 Open the ckm.xml file in a text editor. 3 Change the path value for to indicate where you want to store user and connection infor- mation.
31 Chapter 3: Configuring Contribute After you install Adobe® Contribute® and connect to your website (see “Setting up your Contribute Server Environment” on page 11), you are ready to configure Contribute and Contribute Publishing Server (CPS) to meet your needs. If you are using CPS, you need to enable your website to work with the server and add users to the server. Finally, you can deploy Contribute to your user and give them website connection information.
ADOBE CONTRIBUTE CS3 32 User Guide Web Server lets you configure Contribute to work with your website’s specific web server configuration. Because all websites vary somewhat in how they are set up, the configuration options in the Web Server dialog box let you specify settings specific to your website, which Contribute might not be able to determine automatically.
ADOBE CONTRIBUTE CS3 33 User Guide The Administer Website dialog box appears. 3 Select the administrative settings category you want to modify from the list on the left side of the dialog box. Click the Help button in the dialog or see Using and Administering Contribute for information about options in this dialog box: About Contribute user roles and settings Contribute lets you control access to your website by creating roles.
ADOBE CONTRIBUTE CS3 34 User Guide In general, you shouldn’t need to create too many roles for a website. If you are deploying Contribute in a large organization that uses many internal websites to communicate information, consider creating connections to Contribute from the individual websites and sending appropriate roles to the users who are responsible for each site’s content.
ADOBE CONTRIBUTE CS3 35 User Guide Job Title Contribute Role System administrator Administrator Privileges Installs Contribute, creates connections to the website, and defines Contribute roles appropriate to the magazine’s job functions. The system administrator consults the designer on how to set up role settings so that other members of the magazine’s staff have appropriate editing privileges in their area.
ADOBE CONTRIBUTE CS3 36 User Guide By default, Contribute creates three roles: Administrator, Publisher, and Writer. 3 Click Create New Role. The Create New Role dialog box appears. 4 Select an existing role from the Create new role from copy of list box. Selecting an existing role as a base for a new role lets you reuse the selected role’s settings. You can modify the new role’s settings as needed. 5 Enter a name for the role you want to create, and then click OK.
ADOBE CONTRIBUTE CS3 37 User Guide For more information about the settings, see “Settings for user roles” on page 34. 8 When you finish defining the role, click OK to save your changes. The Role dialog box closes, returning you to the Administer Website dialog box. 9 To create additional roles, repeat steps 4 through 7 for each role you want to add. 10 Select another administrative category to modify, or click Close to apply your changes and exit the Administer Website dialog box.
ADOBE CONTRIBUTE CS3 38 User Guide About Contribute and LDAP or Active Directory Lightweight Directory Access Protocol (LDAP) is a protocol for accessing information directories. Microsoft Active Directory and LDAP are types of directory services. In the case of directory services, a directory is like a telephone book and not like a directory (folder) on your computer. You can integrate the User Directory service of CPS with your directory service.
ADOBE CONTRIBUTE CS3 39 User Guide LDAP authentication types CPS authenticates users against the LDAP directory. For CPS to authenticate a user, the LDAP server must verify the user’s display name. This is usually a unique name in the LDAP tree that is associated with the user. CPS receives only a user name, so it must retrieve the user’s display name, based on the user name, to authenticate the user.
ADOBE CONTRIBUTE CS3 40 User Guide 6 For each connection that CPS does not return, Contribute prompts you for FTP authentication for the corresponding website. 7 If you successfully authenticate access to a website, you can edit the website by using Contribute. Configuring CPS User Directory and other services You should configure CPS User Directory services when you deploy CPS. You can also configure the E-mail Notification and Log services at the same time, or you can wait until later.
ADOBE CONTRIBUTE CS3 41 User Guide Java Application Server Port number IBM Websphere 9080 Adobe JRUN 8900 JBoss 8080 If you select the Simple Installation for installing CPS (see “Installing Contribute Publishing Server (Optional)” on page 23), the URL for the CPS Console is https://localhost:8900/contribute/admin/server.cfm/. The CPS Console launches in a browser.
ADOBE CONTRIBUTE CS3 42 User Guide 6 Click Save Settings to save your settings. If you want to use secure LDAP, see “Configuring the User Directory service to use secure LDAP” on page 42 after you configure the User Directory service. 7 (Optional) Select another service from the Services Settings list on the left if you want to configure the other services now. Now you are ready to start Contribute, and enable your website to use CPS.
ADOBE CONTRIBUTE CS3 43 User Guide To enable CPS: 1 Start Contribute. 2 Select Edit > Administer Websites > Website Name. The Administer Website dialog box appears. 3 Select Publishing Server from the list of administrative categories on the left. 4 Click Enable Publishing Server. The Enable Publishing Server dialog box appears. 5 Enter the Publishing Server web address in the address field and deselect the Enable User Directory check box if you will not use the User Directory service to manage users.
ADOBE CONTRIBUTE CS3 44 User Guide The CPS Console opens to the Website Settings panel. 9 Verify that you want the Log and E-mail Notification services enabled. By default, the Log and E-mail Notification services are enabled. To disable one or more of these services, deselect the appropriate check box, and click Save Settings. Now, Contribute is enabled to use Contribute Publishing Server and you are ready to add users to your website.
ADOBE CONTRIBUTE CS3 45 User Guide 2 Select Users and Roles from the list of administrative categories on the left. 3 Click Add Users. The Add Users dialog box appears. 4 Select a role to assign users from the Role for the new users pop-up menu. The role you assign determines the users’ editing permissions for modifying the site’s pages. 5 Add users to the role you selected.
ADOBE CONTRIBUTE CS3 46 User Guide a Enter a name in the Search text box, and then click Search. Contribute shows the closest matches it finds in the Search Results list. b Select the name of the user you want to add to the role, and click Add to move that user to the list of Users to add. If you inadvertently add a user to a role, you can remove that user by selecting their name in the Users to add list and clicking Remove.
ADOBE CONTRIBUTE CS3 47 User Guide Contribute lets you share website connection information by embedding website information in a connection-key file. Because the connection key is encrypted with a password, any network or File Transfer Protocol (FTP) login information you send in the file remains secure and can be accessed only through Contribute. You can either e-mail the file to users, or save it to your computer for users to download and import.
ADOBE CONTRIBUTE CS3 48 User Guide The Administer Website dialog box appears. 3 Select the Users and Roles category on the left side of the dialog box. The Users and Roles dialog box appears. 4 You can send a connection-key file to a new user, or you can send a connection key to a user who has already connected to the site, and assign them a new role. • To send a connection key to a new user, click Send Connection Key.
ADOBE CONTRIBUTE CS3 49 User Guide 6 After completing the wizard or assistant, a new connection-key file is created for the user, assigning them to a new role. You can e-mail the connection-key file to the user or save the file to your computer. 7 Select another category to modify, or click Close to exit the Administer Website dialog box and save your changes.
ADOBE CONTRIBUTE CS3 50 User Guide To deploy Contribute by using SMS, you must first create a package and add an optional advertisement, which then initiates the deployment process. The package is automatically sent to all the client computers in the organization. The SMS client on each client computer receives the package and then runs it to install the Contribute application. The installation process does not require any user intervention.
ADOBE CONTRIBUTE CS3 51 User Guide 2 On the General tab, enter the name of the package (up to 50 characters), and then enter optional information for any of the following: • Version number of the software package, up to 32 characters • Name of the software publisher, up to 32 characters • Language version, up to 32 characters • Description of the package, up to 127 characters 3 On the Data Source tab, select This Package Contains Source files.
ADOBE CONTRIBUTE CS3 52 User Guide Command Notes This command does not install the Firefox extension. MSIEXEC/I "Adobe Contribute 4.msi"INSTALLFIREFOXPLUGIN="0"/passi ve /norestart/log .log MSIEXEC /I "Adobe Contribute 4.msi"INSTALLIEPLUGIN ="0"/passive /norestart/log .log This command does not install the Microsoft Internet Explorer toolbar. MSIEXEC /I "Adobe Contribute 4.
ADOBE CONTRIBUTE CS3 53 User Guide a Select Advertise The Program To An Existing Collection. b Click Browse to locate the collection if it isn’t visible. c Click Next. 7 Verify that the correct package and collection names appear on the Advertisement Name screen, and then click Next. 8 Specify any sub-collections that should also receive the advertisement on the Advertise To Subcollections screen, and then click Next.
54 Index web address 43 A D about CPS 2 deploying Add Users dialog box 45 responsibilities 8 R Administer Website dialog box 43, 44 tasks 9 roles administration about 33 settings, about 31 E Administrator 33 sitewide settings 32 E-mail Notification, about 2 default 33 administrator, responsibilities 8 Enable Publishing Server dialog box 43 example of 34 C expanded WAR archive 27 Writer 33 Publisher 33 child website 16 compressed WAR archive 27 F S connecting to a website that C
INDEX WebDAV connection information 20 website connections child websites 16 creating 21, 22 overlapping 16 website, address (URL) 22 wizards, Connection Wizard 21 55