
User Guide

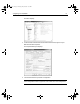
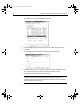
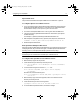
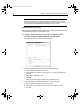
Table Of Contents
- Installing and Configuring ColdFusion Server
- Contents
- Welcome to ColdFusion Server
- Installing ColdFusion Server in Windows
- Installing ColdFusion Server in Solaris
- Installing ColdFusion Server in Linux
- Installing ColdFusion Server in HP-UX
- Basic ColdFusion Server Administration
- Managing Data Sources
- Preparing Your Server for ClusterCATS

18 Chapter 1 Installing ColdFusion Server in Windows
Note
Netscape is case sensitive, so add the lines exactly as they appear here . Enter
each command one line. If you remove ColdFusion Server, you must undo these
changes. Otherwise, the iPlanet/Netscape Web server will not work.
O’Reilly WebSite Professional
This example uses Windows 2000 Professional as the example operating system and
O’Reilly WebSite Professional 3.0 as the Web server.
To configure O’Reilly WebSite Professional for ColdFusion Server:
1Select Start > Programs > WebSite Professional > Server Properties.
The WebSite Pro Server Properties dialog box displays:
2 In the Mapping tab, click Associations in the Mapping Types box.
a In the File Extension text box, enter .cfm.
b In the File Extension text box, click Browse; go to c:\cfusion\bin\WSCF.DLL.
Click Add.
c Repeat Step 2, substituting .dbm.
dClick Add.
The .cfm and .dbm mappings display in the File Extension box.
3 In the Mapping tab, in the Mapping Types box, click Content Types.
a In the File Extension text box, enter .cfm and .dbm.
b In the Media or Server-Side Content text field, enter wwwserver/wsapi.
cClick Add.
install.book Page 18 Thursday, May 10, 2001 12:59 PM