
User Guide

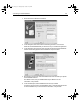
Table Of Contents
- Installing and Configuring ColdFusion Server
- Contents
- Welcome to ColdFusion Server
- Installing ColdFusion Server in Windows
- Installing ColdFusion Server in Solaris
- Installing ColdFusion Server in Linux
- Installing ColdFusion Server in HP-UX
- Basic ColdFusion Server Administration
- Managing Data Sources
- Preparing Your Server for ClusterCATS

134 Chapter 6 Managing Data Sources
Installing and Configuring ColdFusion Server
Creating the data source in ColdFusion
Now you need to create the data source in ColdFusion.
To create the data source:
1 Open the ColdFusion Administrator to the Data Sources, Native Drivers page.
2 Enter a data source name and select the Oracle 8 native driver from the
drop-down list.
3 When you click Add, ColdFusion opens the configuration page for the data
source. Here you enter information that tells ColdFusion where to find the
database. The following options are the most important ones for a successful
connection:
• Host string Enter the exact database alias that you created using the Oracle
Net8 Easy Config utility.
• ColdFusion Login username and password These options display when
you click the CF Settings button. The username and password are the same as
those used in the Oracle Net8 Easy Config connection test. If you do not know
what the username and password should be, see your Oracle 8 DBA.
You might want to avoid setting a username and password here for security
reasons. If you do not set a name and password, each CFML database call
must specifically define a username and password.
4 After you create the data source, open the Verify Data Source page in the
Administrator to verify that ColdFusion can connect to the Oracle 8 database.
install.book Page 134 Thursday, May 10, 2001 12:59 PM