
Programming instructions


38 Chapter 4 Configuring Your Development Environment
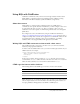
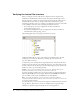
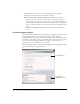
4 Specify the following:
5 Click Show Advanced Settings and ensure that the settings for CLOB and BLOB are
enabled (checked).
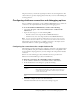
6 Click Submit to complete the data source configuration.
The name CompassTravel appears in the Connected Data Sources dialog box.
7 Click Verify All Connections to ensure that ColdFusion can access this file.
OK appears in the Status column for successful connections.
If the connection to the compass travel data source fails, do the following:
• Verify that the name of the data source file does not contain a space. If it does
contain a space, delete the data source from the Connected Data Source dialog
box. To do this, click the Delete action button associated with the CompassTravel
data source name, then repeat the steps in this procedure to reconfigure this data
source.
• Verify that the path specified for the Compass Travel database file is correct.
To define the sample PointBase database file:
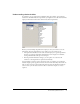
1 In the ColdFusion Administrator, select Data & Services > Data Sources.
The Add New Data Source dialog box appears.
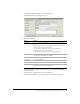
2 Specify the following:
Field Action
Database File text
box
Specify the location of the CompassTravel.mdb file. Click
Browse to locate and select the CompassTravel.mdb file.
By default, ColdFusion MX installs the CompassTravel.mdb file
in one of the following locations:
• For third-party web server configurations:
web_root\cfdocs\getting_started\db
For standalone ColdFusion web server configurations:
cfusionmx\web_root\getting_started\db
Description text box Enter the following:
Database file for Compass Travel tutorial
Field Action
Data Source name
text box
Specify the name CompassTravel.
Note: Ensure that the name of the datasource file does not
contain any spaces. If the name contains a space the data
source connection fails.
Driver drop-down
selection box
Select Other.