
User Guide


252 Chapter 14: Creating a Menu of Adobe Captivate Projects
4.
Using the left mouse button, drag the corner of the project to the new size. The changing width
and height is displayed in the lower right corner of the program window as you drag.
MenuBuilder scales everything in the project to the new size.
Using MenuBuilder shortcut keys
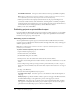
The following are several keys to save time in MenuBuilder.
Setting MenuBuilder preferences
You can set many application preferences for MenuBuilder. These preferences are global: they are
not specific to individual MenuBuilder projects.
To set preferences:
1.
Open MenuBuilder.
2.
From the Options menu, select Preferences.
The Preferences dialog box appears.
3.
Click the Preferences tab and adjust the options.
The following options are in the Grid options area:
Show Grid Select this option to display a grid in MenuBuilder. This grid does not appear in
the final project; it is used during development to position and align text and images.
Snap to Grid Select this option to snap text and images to the grid.
Grid size Use the arrows to select a numeric value for the grid. Values range from 2 to 100.
The following options are in the Auto save options area:
Project Select this option to save projects without a confirmation dialog box.
Desktop Select this option to ensure that MenuBuilder opens with the most recent project.
The following options are in the New project options area:
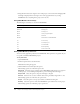
Shortcut key Action
Ctrl+I New image
CtrlCtrl+N New project
Ctrl+P Print project
Ctrl+S Save project/template
Ctrl+T New text
Ctrl+W New instance of MenuBuilder
F1 Access help
F4 Preview project
F5 Preview audio
F7 Check spelling
F11 Full-screen mode