
User Guide


16 Chapter 1: Publishing a New Breeze Presentation
If you did not choose to have a presentation outline and you have manage permissions for the
folder you are publishing to, the next step in the publishing process is “Step 6: Setting
presentation permissions” on page 17.
Follow these guidelines when including a photo:
Photo formats Use one of the following supported formats: JPG, GIF, BMP, or PNG.
Photo size Use a photo less than 100 pixels high and 150 pixels wide. If either of your photo
dimensions is larger, Breeze resizes the image to fit those dimensions.
The speaker photo is placed with the speaker information in the presentation outline above the
listing of slide titles.
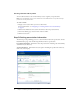
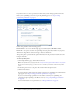
To add a speaker photo:
1.
On the Upload Photo page, click the Browse button.
Note: The Upload Photo page appears after “Step 4: Selecting presentation features” on page 13.
On the Select Features page, you must choose to include a presentation outline and a speaker
photo.
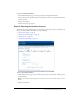
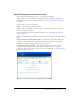
2.
In the dialog box, browse to the photo file, and then click the Open button.
3.
Click the Next button.
If you have manage permissions for the folder to which you are publishing, the Set Permissions
page appears (see “Step 6: Setting presentation permissions” on page 17).
If you do not have manage permissions for the folder to which you are publishing, the
presentation begins uploading to the Breeze server (see “Step 7: Uploading a presentation”
on page 23).
For more information on user permissions, see “About permissions” on page 20.