
User Guide


10 Chapter 1: Publishing a New Breeze Presentation
Step 1: Accessing the Breeze Publish Wizard
When you are ready to publish a PowerPoint presentation, the first step in the publishing process
is to access the Breeze Publish Wizard. You access it by selecting Breeze > Publish from within
PowerPoint. If you are starting a new session, you must access the Breeze server.
To access the Breeze Publish Wizard:
1.
In PowerPoint, open the PowerPoint presentation that you want to publish as a Breeze
presentation.
2.
From the Breeze menu in PowerPoint, select Publish.
The Breeze Publish Wizard login window appears.
3.
If prompted to log in, do the following:
■ Enter your user name (your account e-mail) and password.
■ Click the Login button.
The Set Presentation Location page appears.
Note: You can log out of the Breeze Publish Wizard application at any point by either closing
PowerPoint and all open browser windows, or by clicking the Logout link.
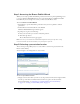
Step 2: Selecting a presentation location
The second step in the publish process is to select where to store the new presentation in the
Breeze Content Library.
You can navigate to an existing folder or create a folder.
To select a presentation location:
1.
Navigate to the location where you want to save the presentation. The trail of navigation links
near the top of the browser window indicates the directory path to the selected folder.
For more information, see “Navigating to an existing folder in the Content Library”
on page 11 or “Creating a Content Library folder” on page 12.