Using the Breeze Publish Wizard
Trademarks Add Life to the Web, Afterburner, Aftershock, Andromedia, Allaire, Animation PowerPack, Aria, Attain, Authorware, Authorware Star, Backstage, Bright Tiger, Clustercats, ColdFusion, Design In Motion, Director, Dream Templates, Dreamweaver, Drumbeat 2000, EDJE, EJIPT, Extreme 3D, Fireworks, Flash, Fontographer, FreeHand, Generator, HomeSite, JFusion, JRun, Kawa, Know Your Site, Knowledge Objects, Knowledge Stream, Knowledge Track, LikeMinds, Lingo, Live Effects, MacRecorder Logo and Design, Macrome
CONTENTS INTRODUCTION: Using the Breeze Publish Wizard . ....................... 5 Overview of creating a Breeze presentation . . . . . . . . . . . . . . . . . . . . . . . . . . . . . . . Intended audience . . . . . . . . . . . . . . . . . . . . . . . . . . . . . . . . . . . . . . . . . . . . . . . . . . System requirements and account information . . . . . . . . . . . . . . . . . . . . . . . . . . . . Accessing the Breeze Publish Wizard . . . . . . . . . . . . . . . . . . . . . . . . . . . . . . . . . .
Contents
INTRODUCTION Using the Breeze Publish Wizard Macromedia Breeze is a web platform that provides a single solution for delivering rapid training and communication across an organization. It consists of three components: the Macromedia Breeze Presentation platform, the Breeze Training Module, and the Breeze Live Module. The Macromedia Breeze Presentation platform provides the base for you to create and deploy multimedia content.
Use the Macromedia Breeze Plug-in for Microsoft PowerPoint to add audio and synchronized animations to your PowerPoint presentation. For more information, see Using the Macromedia Breeze Plug-in for Microsoft PowerPoint. You can access this information after installing the Breeze plug-in by selecting Breeze > Help in PowerPoint. to the Breeze server by using the Breeze Publish Wizard web application in conjunction with the Breeze Plug-in for PowerPoint.
Upload a new presentation to the Breeze server by specifying its title, summary, speaker details, where it should be stored in the Content Library, what features it should include, and who has permission to view it. Publish a new Breeze presentation Update an existing Breeze presentation You need to upload only the differential changes from the previous version of the presentation. You can also edit the presentation information, features, and permissions.
Introduction: Using the Breeze Publish Wizard
CHAPTER 1 Publishing a New Breeze Presentation After adding audio and synchronized animations to your PowerPoint presentation, you are ready to publish the presentation to your Macromedia Breeze server for conversion into a multimedia web presentation. The steps for publishing a new presentation are as follows: “Step 1: Accessing the Breeze Publish Wizard” on page 10 Access the Breeze Publish Wizard in PowerPoint.
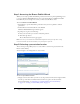
Step 1: Accessing the Breeze Publish Wizard When you are ready to publish a PowerPoint presentation, the first step in the publishing process is to access the Breeze Publish Wizard. You access it by selecting Breeze > Publish from within PowerPoint. If you are starting a new session, you must access the Breeze server. To access the Breeze Publish Wizard: 1. In PowerPoint, open the PowerPoint presentation that you want to publish as a Breeze presentation. 2.
2. Click the Publish to This Folder button. The Edit Information page appears. Navigating to an existing folder in the Content Library When you log in to the Breeze Publish Wizard, you are in your personal user folder in the Content Library. Note: Only your Breeze presentations are displayed in the Content Library. Other Breeze content, including SWF files, FLA files, and JPG files, are not displayed when you view the Content Library in the Breeze Publish Wizard.
Creating a Content Library folder You can add new folders to the Content Library to better organize your presentations. Note: You can add folders only if you are a Breeze Account Administrator or if you have manage permissions for the parent folder. To create a folder: 1. Navigate to the location where you want to add a folder. For more information, see “Navigating to an existing folder in the Content Library” on page 11. 2. Click the New Folder button located in the menu bar above the presentation list.
To set presentation information: 1. On the Edit Information page, enter the presentation and speaker information. The presentation title, speaker first name, and speaker last name are required fields. All other fields are optional. 2. Click the Next button. The Select Features page appears. Step 4: Selecting presentation features The fourth step in the publishing process is to select the presentation features to include in your Breeze presentation.
If you select the options to include an outline and a speaker photo, the Upload Photo page appears (see “Step 5: Selecting a speaker photo (optional)” on page 15). If you do not select the option to include a photo and you have manage permissions for the folder you are publishing to, the Set Permissions page appears (see “Step 6: Setting presentation permissions” on page 17). Otherwise, the presentation begins uploading (see “Step 7: Uploading a presentation” on page 23).
Settings for slide timings The Select Features page includes three settings for slide timings: Pause after each slide If this option is selected, presentation playback is not continuous. Every new slide starts in a paused mode, and the viewer must click the Play button in the presentation control bar to play it. If this option is not selected, each slide begins playback at the moment it is displayed.
If you did not choose to have a presentation outline and you have manage permissions for the folder you are publishing to, the next step in the publishing process is “Step 6: Setting presentation permissions” on page 17. Follow these guidelines when including a photo: Photo formats Use one of the following supported formats: JPG, GIF, BMP, or PNG. Use a photo less than 100 pixels high and 150 pixels wide. If either of your photo dimensions is larger, Breeze resizes the image to fit those dimensions.
Step 6: Setting presentation permissions The sixth step in the publishing process is to set presentation permissions. This step applies only to users who have manage permissions for the folder to which they are publishing. If you do not have manage permissions, go to “Step 7: Uploading a presentation” on page 23. You can create two types of presentations: Public Anyone can view a public presentation. Private Only selected Breeze users can view private presentations.
Using the default permission setting The default permission setting is Same as Parent Folder. The presentation automatically inherits the same permission profile as the parent folder in which it is published. If the parent folder has permission for public viewing, the presentation also has permission for public viewing. If the parent folder has private settings, the presentation also has private settings. For more information on user and folder permissions, see “About permissions” on page 20.
Creating a public presentation To create a public presentation, select the Allow Public Viewing option on the Set Presentation Permissions page. To create a presentation available for public viewing: 1. On the Set Permissions page, click the Customize button. Note: The Set Presentation Permissions page appears after “Step 4: Selecting presentation features” on page 13, or after “Step 5: Selecting a speaker photo (optional)” on page 15 if you included a speaker photo. 2.
2. Make sure that you select No for the Allow Public Viewing option. 3. Click the Add button. A list of users and groups appears. 4. Select the type of permission you want to assign to specific groups or users from the select box at the top of the window. For more information, see “Permission types” on page 21. 5. Select the groups or users that you want to add to the permission profile for the permission type selected in step 4. 6.
Permission profile This is a list of all groups or users and their corresponding permission types for a specific folder or file. Group default permissions These are the default permissions for the built-in groups and the permissions you set when you create a group. They correspond to the group’s permission type for the Shared Content folder in the Content Library and the Shared Courses folder in the Course Library.
Content Library capabilities No access/ Access denied View Publish Manage Download content X ✔ Set content file permissions X ✔ Create content folders X ✔ Move content folders X ✔ Delete content folders X ✔ Set content folder permissions X ✔ View reports X View My Content X View Users Content* X * ✔ ✔ ✔ Must be a member of the Account Administrators group.
3. From this permissions page, change the permission type assigned to each group and individual for this folder. Note: To simplify account management, it is best to assign permissions only at the group level, not at the individual level, whenever possible. Step 7: Uploading a presentation The final step in the publishing process is to upload your presentation to the Breeze server. Your presentation begins uploading when you click the Finish button in “Step 6: Setting presentation permissions” on page 17.
Chapter 1: Publishing a New Breeze Presentation
CHAPTER 2 Updating and Replacing Presentations In addition to creating a Macromedia Breeze presentation with the Breeze Publish Wizard, you can also update or replace an existing Breeze presentation. Updating a presentation If you attempt to republish a presentation that has already been published to the Breeze server, you are given the option to update the existing presentation.
Replacing a Breeze presentation with no changes to the presentation information When you attempt to publish a presentation that already exists, a Publish Existing Presentation page with three options is displayed. One option is Publish Now. If you select this option, only the differential changes in the presentation are uploaded. You cannot edit the presentation information, included features, or permissions.
■ If the presentation does not contain a photo, Click Browse and browse to the file with the speaker photo and then click the Next button. For more details, see “Step 5: Selecting a speaker photo (optional)” on page 15. ■ If the presentation already contains a speaker photo, the current photo is displayed on this page. You have the option of using the current photo or uploading a new photo. To change the photo, click Browse and browse to the file with the speaker photo, and then click the Next button.
To replace an existing presentation: 1. On the Set Presentation Location page, click Select New Location. The Select Presentation Location page appears. 2. For new and existing presentations, in the Content Library, navigate to the presentation that you want to replace on the Set Location Presentation page. For more information, see “Navigating to an existing folder in the Content Library” on page 11. 3. Click the name of the existing Breeze presentation that you want to replace.
CHAPTER 3 Frequently Asked Questions This chapter includes questions frequently asked by users who are publishing Breeze content with the Breeze Publish Wizard. How do I add a new user? You cannot add new users using the Breeze Publish Wizard. A Breeze Account Administrator must add users in the Breeze Manager web application. For more information, see Using the Breeze Manager.
Private presentation Only authorized Breeze users can view private presentations. After you finish publishing a presentation, you receive an e-mail notification containing the URL for the website where you can view the Breeze presentation. Anyone who uses the URL to view the presentation is prompted to log in with a Breeze user name and password. Even with a valid Breeze user account, the user cannot view the presentation without the appropriate permission.
CHAPTER 4 Troubleshooting This chapter presents solutions to problems that some users encounter when using the Breeze Publish Wizard to publish Breeze content. Cannot set permissions for a presentation Only Breeze users who have manage permissions for the folder to which the presentation is being published can set permissions for that presentation. Contact your Breeze Account Administrator to make sure that you have manage permissions for the folder.
Chapter 4: Troubleshooting