Installation and Configuration Guide
Trademarks 1 Step RoboPDF, ActiveEdit, ActiveTest, Authorware, Blue Sky Software, Blue Sky, Breeze, Breezo, Captivate, Central, ColdFusion, Contribute, Database Explorer, Director, Dreamweaver, Fireworks, Flash, FlashCast, FlashHelp, Flash Lite, FlashPaper, Flex, Flex Builder, Fontographer, FreeHand, Generator, HomeSite, JRun, MacRecorder, Macromedia, MXML, RoboEngine, RoboHelp, RoboInfo, RoboPDF, Roundtrip, Roundtrip HTML, Shockwave, SoundEdit, Studio MX, UltraDev, and WebHelp are either registered tradema
CONTENTS INTRODUCTION: Breeze Installation Overview . ..........................5 Guide to documentation and additional resources. . . . . . . . . . . . . . . . . . . . . . . . . . 6 Troubleshooting . . . . . . . . . . . . . . . . . . . . . . . . . . . . . . . . . . . . . . . . . . . . . . . . . . . 8 CHAPTER 1: Before You Begin . ....................................... 9 Basics of Breeze Server technology . . . . . . . . . . . . . . . . . . . . . . . . . . . . . . . . . . . . . .
CHAPTER 4: Post-installation . . . . . . . . . . . . . . . . . . . . . . . . . . . . . . . . . . . . . . . . 57 Deploying Breeze to your organization . . . . . . . . . . . . . . . . . . . . . . . . . . . . . . . . . 57 Implementing single sign-on . . . . . . . . . . . . . . . . . . . . . . . . . . . . . . . . . . . . . . . . . 61 Configuring the Breeze Directory Service Integration . . . . . . . . . . . . . . . . . . . . . . 62 Configuring SSL support for Breeze . . . . . . . . . . . . . . . . . . . . . .
INTRODUCTION Breeze Installation Overview Macromedia Breeze consists of Breeze Server and its applications: Macromedia Breeze Meeting, Macromedia Breeze Presenter, Macromedia Breeze Manager, Breeze Events, and Breeze Training. Depending on the configuration purchased and the terms of your license, you may be installing one, two, or all of these applications. Breeze Server Makes it possible to quickly create multimedia presentations that combine audio and video with slides and graphics.
Breeze Presenter Lets you rapidly create e-learning content and high-quality multimedia presentations. Breeze Presenter is a plug-in for Microsoft PowerPoint. Finished presentations are in Macromedia Flash (SWF file) format and are SCORM and AICC compliant. Breeze Training Lets you build e-learning systems, with surveys, tracking, analysis, and course management.
To help you determine what documentation is relevant to your needs, see the following table: Breeze user type Recommended reading Information technology (IT) engineer • Breeze Installation and Configuration Guide • Review the system requirements in all other user guides Content managers in charge of overall content within Breeze, and administrators who may add users and permissions • Breeze Manager User Guide • Breeze Meeting User Guide for Hosts and Presenters Content authors and instructional design
Breeze Documentation Center This site, at www.macromedia.com/go/ breeze_documentation, contains documentation for all Breeze products, answers to frequently asked questions, articles about specialized topics, and Breeze presentations. Breeze Support Center This site, at www.macromedia.com/support/breeze, contains current support information, including technical notes, helpful Breeze presentations, and support program details.
CHAPTER 1 Before You Begin For a successful installation of Macromedia Breeze, read the information provided in this chapter.
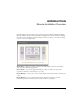
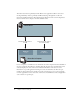
The web browser interacts primarily with the Breeze Server applications. When a user starts a meeting, Flash Player interacts primarily with Breeze Meeting, although there is still some interaction with Breeze Presenter. The following figure illustrates how the server hosting Breeze interacts with the user’s computer, sometimes called the client.
Starting a meeting Tracing the sequence in which Breeze applications execute when users start a meeting can help you understand the primary system applications. The following list explains the typical order in which Breeze calls upon applications to place users successfully in a meeting: 1. The web browser collects the login credentials and communicates the credentials to Breeze Server. 2. Breeze Server accepts the login credentials and validates the user. 3.
Calculating bandwidth usage Here are some bandwidth calculations based on a meeting with audio, video, and slides. Calculations are based on 1024x768 full screen. • Room bandwidth: Modem setting ■ One Presenter can generate about 26 Kbits/sec of data. ■ Viewers need about 29 Kbits/sec of downstream bandwidth to have a good experience. ■ Having more than one Presenter on a modem room setting is not recommended. ■ Screen sharing is not recommended for use with the Modem bandwidth setting.
Planning for directory services integration Directory services integration lets the Breeze administrator synchronize the Breeze internal directory of users and groups with an external source such as an organization’s LDAP (Lightweight Directory Access Protocol) server. The Breeze administrator can synchronize the internal and external directories on demand or at scheduled intervals.
Directory services integration In an LDAP schema, all directory entries are arranged in a hierarchical tree-like structure that reflects the organization’s political, geographic, or administrative regions. For example, the IT administrator at a company with multiple worksites wants to let everybody in the organization use Breeze.
Implementing SSL for Breeze There are two options available for implementing SSL-based authentication with Breeze: • Using the native support in Flash Communication Server’s (FCS) for SSL. Use this option if you want to secure only Breeze and not the web application. You will need 2 IP addresses (2 DNS entries for the IP addresses) and 1 SSL certificate. You will need to modify SSL tags in the Flash Adaptor.xml and Server.xml files configuration files.
The discussion on security is divided into the following sections: • • • • Security levels Solutions for a secure infrastructure Best practices Additional references Security levels When planning a security strategy, it is important to consider the various layers in a deployed server environment, and devise a security plan for each layer.
Breeze web server Breeze comes with its own built-in, high-performance, secure web server. This web server is based in part on Macromedia JRun Enterprise Server and has been designed specifically to serve dynamic content for Breeze, including Breeze Meetings, Breeze Presentations, Breeze Seminars, and other rich media content. Because of Breeze’s special requirements, no other web servers (such as Apache) can be used with Breeze.
Single-server configuration The easiest solution for a dedicated, single-server Breeze system is to block all ports on the server except 80, 1935, and 443 for SSL-enabled traffic. An external hardware firewall appliance provides a layer of protection against gaps in the operating system. Some organization configure layers of hardware-based firewalls to form DMZs.
It is very important that you understand how to secure a multiserver installation. The following are suggestions for securing multiserver solutions. • Private networks The simplest solution for multiserver solutions in a single location is to create an extra subnet for the Breeze system. This solution offers a high level of security, but it can be expensive.
• Authors Members of the Account Authors group have access to publishing features. They can publish content to the Breeze system. • Events Administrators This group includes anyone who organizes events. An event can be any meeting, presentation, course, curriculum, or seminar that requires registration and generates reports with participant tracking information. • Learners This group includes anyone who attends any meeting, presentation, course, curriculum, or seminar.
Best practices The following is a checklist of best practices that will assist you in securing Breeze. • Protect your servers with firewalls. You should place the Breeze server behind a firewall, especially if Breeze is accessed through the Internet. If you do not place Breeze behind a firewall, you are leaving the server open for attacks. Your sensitive information is unsecured and open for theft. All servers should sit behind a firewall, including the system(s) hosting Breeze and the database server.
Security resources and references The following are sources of information and software that may aid the process of securing the Breeze server(s). • Network security SANS Institute (www.sans.org) The SANS (System Administration, Networking, and Security) Institute is a cooperative research and education organization comprised of system administrators, security professionals, and network administrators. It provides great network security courses, as well as certification in network security.
Port Port Bind Configurable Address 1433 Yes Bind Address Configurable Access Protocol Password Protected Default=any Yes. If SQL Server is used, the default is the IP address of computer. If the embedded engine is used, the default value is the Breeze LOCAL_HOST variable. 2909 Yes 127.0.0.1 Yes Private JNDI No 8505 Yes Yes Internal hostname. This IP needs to be visible only to the systems in the cluster. Private HTTP No.
• Clustering Breeze allows the computers in a cluster to share session data with each other for effective load balancing and failover. Planning for a Breeze Server cluster In a Breeze Server cluster, an identical copy of Breeze is installed on each server in the cluster. Each server must be able to access the Breeze database of users and groups.
You configure Breeze on the clustered servers during the installation and post-installation by performing the following: • Installing Breeze on each server in the cluster. • Setting the values in the Breeze custom.ini configuration file on one server in the cluster. • Making sure there is a copy of this configuration file on all servers in the cluster. For more information, see Chapter 4, “Post-installation,” on page 57.
• Minimum requirements: ■ Pentium 4, 2-GHz processor ■ 1 GB of RAM ■ 80 GB hard disk ■ CD-ROM drive ■ 1.5MB Network Connection (T1) • For Breeze deployment with encrypted SSL enabled: ■ SSL Hardware Accelerator (optional) • Communication ports ■ Port1935 for RTMP ■ Port 80 or other for HTTP ■ Port 443 secured if SSL is enabled For a complete list of ports used by Breeze, see “Ports used by Breeze” on page 22.
Additional software requirements The computers hosting Breeze Server also require the following software: • An SMTP e-mail server Breeze Server requires an SMTP e-mail server for sending e-mail notifications. The SMTP server can be on the same computer or can be relayed to another computer such as a UNIX sendmail server or a Microsoft Exchange Server. • The NTFS file system To verify that the server is using NTFS, do the following: 1. Double-click the My Computer icon on the Windows desktop. 2.
Additional requirements: • Macromedia Flash Player 6.0.79 or later • Minimum bandwidth requirements: 56 kb/sec Breeze Meeting presenters The following software must be installed on these users’ computers: • Windows 98SE, ME, XP, NT 4.0, 2000, 2002, or 2003 • Supported browsers in Windows ■ Internet Explorer 5.0, 5.5, 6.0 ■ Netscape Navigator 6.2, 7.1 ■ AOL 8, 9 ■ Compuserve 7 (2000, 2002, 2003, and XP only) ■ Firefox 1.0 or: • Macintosh 9.2, OS X 10.
The Breeze database Breeze Server requires a database created with either the embedded database engine or Microsoft SQL Server 2000. The Breeze database stores information about users, content, courses, meetings, and reports. • The embedded database engine comes with Macromedia Breeze. You install it at the same time that you install Breeze Server.
Chapter 1: Before You Begin
CHAPTER 2 Preparing to Upgrade This chapter provides instructions about the preparatory tasks you need to complete before you start the upgrade process from Macromedia Breeze version 4.1 to version 5.
Before you begin As with any software upgrade project—especially one that affects a workgroup—communication and planning are very important. Before you begin upgrading or adding modules to your Breeze installation, Macromedia suggests that you do the following: • Allocate enough time to ensure a successful upgrade. Macromedia recommends that you schedule one day of downtime for a Breeze upgrade. • Let your users know in advance that they won’t be able to use Breeze during the upgrade.
Backing up the Breeze database The Breeze database includes the collected records of Breeze users and groups. To back up the Breeze database: 1. Restart your database: ■ From your Windows desktop, select Start > Settings > Control Panel > Administrative Tools > Services. In the Services window, right-click MSSQLSERVER and select Start from the context menu. 2. From your Windows desktop, select Start > Run. 3. In the Run dialog box, type cmd in the Open text box. 4.
Preparing for the upgrade To prepare your system for the Breeze upgrade: 1. Stop the Macromedia Breeze Application Service, which stops Breeze Presenter and Breeze Training: a From your Windows desktop, select Start > Settings > Control Panel > Administrative Tools > Services. b In the Services window, right-click Macromedia Breeze Application Service and select Stop from the context menu. 2. If you have Breeze Meeting, stop the Flash Communication Admin Service and Flash Communication Server.
CHAPTER 3 Installing and Upgrading Breeze This chapter presents information on the following topics: • • • • • • • • • “Installation checklist” on page 35 “Installation and configuration overview” on page 36 “Using the Breeze installer” on page 37 “The Application Management Console” on page 43 “Starting and stopping Breeze components” on page 53 “Uninstalling Breeze” on page 54 “Troubleshooting” on page 54 “Breeze technical support” on page 55 “Macromedia online forums” on page 55 Installation checklis
To verify that the system employs NTFS: 1. On your Microsoft Windows desktop, double-click My Computer. 2. In the My Computer window, right-click the drive where Breeze is installed and select Properties from the context menu. In the General tab of the local Disk Properties window, the file system should specify NTFS. • Adequate disk space is available on the drive or server where you want to install Breeze Server: ■ 1,224.
Using the Breeze installer Use the procedures described in this section to install Breeze. Macromedia recommends that you close all other applications before you start to install Breeze. To install and configure Breeze: 1. Insert the Breeze installation CD into the CD-ROM drive. If the Breeze installer does not start automatically, double-click the setup.exe file in the installation CD’s root folder. The installer Welcome screen appears. 2. Click Next. The License Agreement screen appears.
3. Read the agreement, click Accept, and click Next to continue. The Select Destination Location screen appears. 4. Click Next to accept the default installation (c:\breeze) location, or click Browse to select a different location, and then click Next. If the default location already exists, the Folder Exists dialog box appears.
5. Click Yes to continue. The Company Information screen appears and asks you to enter your serial number. The License Certificate that comes with the installation CD contains the serial number. 6. Enter the serial number and click Next to continue. If the installer determines that a SQL database server is present on your system, the following notice appears. You do not need to uninstall the SQL server.
7. Click Next to continue. The Select Start Menu Folder screen appears. 8. Accept the default shortcut, or click Browse to select a different location, and then click Next. The Ready to Install screen alerts you that the Breeze installation is about to begin. 9. Review the choices for the destination folder where Breeze will be installed and for adding Macromedia Breeze to the Start Menu folder.
10. Click Back to review or change these settings or click Install to continue. The Installing screen appears. The installer is extracting Breeze Server files on the installation CD and installing them. This process takes approximately two minutes. 11. Click Cancel at any time to terminate or cancel the installation. You may also see the following message.
12. Click OK to continue. You can reboot the server after the Breeze installation and configuration is complete. The Initializing Macromedia Breeze service screen appears. 13. Select the option to start Breeze and press Next to continue. A message appears that the Macromedia Breeze Application Service service is starting. Breeze runs as a Windows service. Breeze is defined as the Macromedia Breeze Application service and the Flash Communication Server service in the Services screen.
Click Finish to complete the installation process. The Application Management Console opens to guide you through the tasks to configure Breeze Server. The Application Management Console After installing the software, the Breeze installer automatically starts the Application Management wizard to guide you through the next series of tasks. The Application Management Console provides a graphical user interface to the custom.ini configuration file, which is located in the folder where Breeze is installed.
Configure the database settings The Breeze administrator uses the Database Settings screen to configure the following variables for the Breeze database: Variable Default value Description DB_HOST localhost Name of the Microsoft SQL Server 2000 host computer. DB_NAME breeze Name of the Breeze database. DB_USER sa User name for Breeze Server employed when creating and accessing the Breeze database.
Database creation If the Breeze database whose name appears on the Database Settings screen (the DB_NAME variable in the custom.ini file) was not created, the administrator sees a confirmation screen. The administrator is asked to confirm whether to create the database or not. Upgrade confirmation The Upgrade Confirmation screen asks the administrator to confirm that they want to upgrade Breeze 4.1 to Breeze 5, and if the following backup procedures are completed: • The content directory is backed up.
The administrator must confirm that these procedures are complete before the Console can proceed with the upgrade to Breeze 5. The Console creates a new Breeze 5 database. The data from the existing Breeze database is copied and migrated to a Breeze 5 database. You must specify a new name for the new database. Do not use the name of an existing database. Step 3 of the Console asks you to verify that you completed the requirements in Steps 1 and 2. Click Upgrade Breeze to proceed.
Before you contact Breeze Technical Support, have the Breeze License Certificate from Macromedia available. The certificate contains the unique serial number required for your installation. Upgrade in progress screen The Console displays an upgrade in progress screen informing the administrator of the status of the upgrade. The system refreshes the screen every five seconds as the upgrade progresses.
Breeze Server settings The Breeze administrator defines the settings for the Breeze Server on the Breeze Server Settings screen. Click Next to continue.
The following table describes the fields on the Breeze Server Settings screen: Field Default value Description Account Name [none] Enter a name that readily identifies the Breeze account, such as “Enterprise Account” or “My Breeze 5 Account.” BCC_EMAIL [none] Blind-copy e-mail address to which all notifications that users receive are also sent. This variable allows administrative tracking of e-mail messages sent through Breeze without exposing an internal e-mail address.
Upload the Breeze license file The Upload License File window appears. An Internet connection is required at this point. The Breeze license file identifies those Macromedia Breeze applications that you are authorized to use. Have the Breeze License Certificate from Macromedia available. The license contains a unique serial number for your installation. To upload the Breeze license file: 1.
The File Download window appears. 4. Check the Close This Dialog Box When Download Completes check box. The Create Administrator window appears. This step is mandatory. You must create an administrator for Breeze now. Administrative privileges are required for configuring and maintaining Breeze. Enter the name, email address, and password of the Breeze administrator. These are required fields.
5. Click Finish. The Configuration Complete screen appears. At this point you can do the following: ■ Log in to Breeze ■ Return to the Console to change the Breeze configuration. ■ View the online Getting Started Guide. Application Settings Summary The Application Settings summary screen displays the settings you configured with the Console, and the Breeze features that the license file enables. To return to the Console, select Start > Programs > Macromedia Breeze.
Completing a terminated installation If the installer terminates during the installation of any Breeze component that includes the embedded database engine, use the following procedure to complete the installation. Note: If you were installing Breeze and the embedded database engine when the installation terminated, uninstall the embedded database engine before you complete the following steps. For more information, see the Breeze TechNote “Installer detects existing installation of SQL Server” at www.
To start Breeze Meeting: 1. Select Start > Programs > Macromedia Breeze > Start Breeze Meeting Server. 2. To verify that the following services are running, select Start > Settings > Control Panel > Administrative Tools > Services. Confirm that the following services associated with Breeze Meeting are running: ■ Flash Communication Admin Service ■ Flash Communication Server To stop Breeze Meeting: 1. Select Start > Programs > Macromedia Breeze > Stop Breeze Meeting Server. 2.
Breeze technical support For security and privacy reasons, Breeze product support cannot assist Breeze Meeting customers in gaining access to private meetings, events, or seminars. Only the Meeting Manager or Breeze Administrator can register users or grant access to meetings, events or seminars. If your company has a software license for Breeze (meaning it is running internally on your company network), please contact your help desk or Breeze administrator.
Chapter 3: Installing and Upgrading Breeze
CHAPTER 4 Post-installation This chapter describes the series of configuration and deployment tasks that you need to complete after you install the Macromedia Breeze applications and complete the first phase of configuring Breeze with the Application Management Console.
• Will some users interact with the servers by communicating through a firewall or proxy? Verify that your firewall or proxy server configuration allows end users to interact with the servers. You must also use the proper configuration of servers. • Are you adding a Secure Sockets Layer (SSL) and encryption? Verify that you correctly set up and configured your SSL solution following the tips in this document. For details, see “Configuring SSL support for Breeze” on page 77.
If you are installing Breeze in large organizations where there may be more demands on system resources, you might consider the following strategies: • Clustering Breeze Servers Creating a cluster of servers lets you distribute end-user traffic across multiple servers. Use this configuration if you have many users and are concerned about the load on a single server, or when you want to have more than one server as a redundant system, in case a single server experiences hardware failure.
• Firewalls and proxy servers Firewalls and proxy servers can cause problems for a single-server Breeze configuration. Breeze Server uses port 80 by default, which most firewalls and proxy servers allow. Breeze Meeting uses port 1935 by default, and reverts to port 443 if port 1935 is not successful. Ports 443 and 1935 are not as common to firewalls and proxy servers; if necessary, Breeze Meeting attempts to use port 80 to interact with the Breeze user’s computer if ports 1935 and 443 aren’t available.
Integrating Breeze with learning management systems All LMS integration occurs through Breeze Presenter. For more information, see Breeze Presenter User Guide. Implementing single sign-on Single sign-on (SSO) is a mechanism whereby a single action of user authentication allows a user to access all computers and applications where they have access permission without the need to enter multiple passwords. Single sign-on reduces human error, a major component of systems failure.
Reconciling login policies Breeze and the Microsoft NTLM have different login policies for authenticating users. These policies must be reconciled before the user can employ a single login to access Breeze and other applications. The organization’s login and password policy determines what the external login looks like. By default, Breeze employs the user’s email address (jdoe@mycompany.com) and password as the primary login to authenticate the user.
Configure the connection settings On this screen the administrator provides the location of the organization’s Directory Service and the authorization to access it. Breeze uses this information to connect to the Directory Service.
The following example shows connections settings in one LDAP syntax: URL: ldap://mycompany.com:636 Username: MYCOMPANY\jdoe Password: password123 Query timeout: (empty) Authentication mechanism: Simple Note: This is an example. Consult your local LDAP admin for the appropriate settings and syntax.
Map the Breeze user profile to the Directory Service The administrator uses the User Profile Mapping screens to provide the information that Breeze uses to map the fields in its user profiles to their equivalent LDAP attributes when the organization’s Directory Service and the Breeze directory of users are synchronized.
The following table describes the field names in the User Profile Mapping screen: Field Default Value LDAP attribute/Notes First Name Required field. No default. givenName Last Name Required field. No default. sn Email Required field. No default. UserPrincipalName Custom Field 1 Optional field. Many options are available for defining custom fields under Admin > Users and Groups > Customize User Profile. Login Required field. No default.
Adding user branches Each branch in the organization is defined by its own DN (distinguished name) attribute. When you click Add in the User Profile Mapping screen to add the user information for other branches of the organization when the directories are synchronized, the following screen is displayed. The following table describes the fields in the User Profile Mapping screen. Field Default Value LDAP attribute/Notes Branch DN No default DN (distinguished name) of the branch root node.
Note: This is an example. Consult your local LDAP admin for the appropriate settings and syntax. The same information is used for mapping group branches. Map the Breeze group profile to the Directory Service On the Group Profile Mapping screen, the administrator provides the information that Breeze uses to map the fields in its group profiles to their equivalent LDAP group entries when the organization’s Directory Service and the Breeze directory of groups are synchronized.
The following example shows one LDAP syntax of how to map a group profile: Name: sAMAccountName Membership attribute: member Note: This is an example. Consult your local LDAP admin for the appropriate settings and syntax. To map additional groups, click Add to display the Group Branch screen. Adding group branches Each group in the organization is defined by its own DN attribute on the following screen.
The following example shows one LDAP syntax for how to add a branch of the organization and define its groups: Add branch: DN: cn=USERS,DC=myteam,DC=mycompany,DC=com Filter: (objectClass=group) Subtree search: True Note: This is an example. Consult your local LDAP admin for the appropriate settings and syntax. The same information is used for mapping user branches.
• Manual synchronization immediately synchronizes the Breeze directory and the organization’s directory service. • Preview synchronization is similar to a manual synchronization, but no changes are made to the Breeze directory. The log file assists the administrator in diagnosing any problems that might occur during the synchronization. • Scheduled synchronization occurs at defined intervals. The existing Breeze scheduler mechanism is used.
View the synchronization log files Each synchronization generates a log file that describes each principal processed and the result. In the case of a preview synchronization, the log describes the action that would be taken if this were a manual synchronization. Logs consist of events with one line per event. The synchronization produces at least one event for every individual principal processed. In some cases more than one event might be produced.
Log file format The log is in comma-separated value format and demarcates the following values: Field Description Date Formatted date-time value to the millisecond. The format is yyyyMMdd'T'HHmmss.SSS. Principal ID Breeze login or group name. Principal Type A single character: U for user, G for group. Event The action taken or condition encountered. Detail Detailed information about the event.
Synchronization events and details The following table describes the events found in the synchronization log files: Event Description add Principal added to Breeze update Detail Abbreviated XML packet that describes the updated fields. A series of value. The parent node and non-updated fields are omitted. For example: The principal exists as Joe an external user in Breeze and some fields Schmoe were updated.
Define the password policies The Breeze administrator uses the Policy Setting screen to define the password setup policy for the synchronization. Passwords are pieces of user data that are dealt with separately from the other data in an external directory. Passwords are rarely available in clear text form, if they are available at all. A synchronization cannot copy a password into Breeze from another source.
The administrator chooses one of the following options for how the synchronization should set the passwords for new users. The administrator determines the password policy on the Password Setup Policy screen of the Console. • Do nothing. If you have integrated Breeze with an external authentication system, there is no need for the synchronization to create new passwords just for Breeze. Users will log in to Breeze according to the mechanism of the external authentication system.
User authentication Organizations need to authenticate users of applications such as email. The following strategies use the Breeze authentication mechanism to validate users: • No external authentication integration Breeze users keep separate passwords. Application users keep their passwords to log in with their organization’s network username. Not integrating the internal and external logins means that users keep their existing network logins and Breeze passwords.
You can deploy Breeze with an SSL layer in one of the following ways: • A software-based solution by configuring the native support for SSL in Flash Communication Server (FCS). Use this option if you want to secure only Breeze and not the web application. You will need 2 IP addresses (2 DNS entries for the IP addresses) and 1 SSL certificate. You will need to modify SSL tags in the Flash Adaptor.xml and Server.xml files configuration files.
Locating the required SSL tags in the Server.xml file The SSL-enabling tags in the Server.xml file occur in the following sequence: • • • • • • • • SSLEngine SSLRandomSeed SSLSessionCacheGC SSLVerifyCertificate SSLCACertificatePath SSLCACertificateFile SSLVerifyDepth SSLCipherSuite Defining the SSL tags in FCS The following table lists the tags in the Adaptor.xml and Server.xml files that configure FCS for SSL. FCS File XML Tag Default Description Adaptor.
FCS File XML Tag Default Description Adaptor.xml SSLCipherSuite 80 Specifies the ciphers to use. This is a list of colondelimited components. A component can be a key exchange algorithm, authentication method, encryption method, digest type, or one of a selected number of aliases for common groupings. For a list of components, see the FCS documentation. The default setting for this tag is: ALL:!ADH:!LOW:!EXP:!MD5:@STRENGTH Contact Breeze Technical Support before changing the default settings. Adaptor.
FCS File XML Tag Default Description Server.xml SSLCACertificatePath [none] Specifies the name of a directory containing CA certificates. Each file in the directory must contain only a single CA certificate, and the files must be named by the subject name's hash, and an extension of ".0". Win32 Only: If this tag is empty, FCS will attempt to find CA certificates in the certs directory located at the same level as the conf directory.
Implementing SSL-enabled Breeze with an Accelerator To implement Breeze with an SSL-enabled accelerator, the following resources are required: • Two external IP addresses and one internal IP address. • One NIC card. • Breeze Server is configured to listen on port 443 externally and forwards unencrypted to the Breeze server on port 443. • Breeze Server is also configured to forward any port 80 traffic coming from Breeze Server, and loop this traffic back to Breeze Server on port 80.
Variable Default value Description ADMIN_HOST [none] Host name to use in a URL for accessing Breeze. This is the host name that users enter directly in their browsers. For example, for the URL http://aserver.mybreeze.com, you set ADMIN_HOST as shown in the following example: ADMIN_HOST=aserver.mybreeze.com If your web server uses a port other than port 80 for receiving HTTP messages, the port number must be added to the host name, as shown in the following example: ADMIN_HOST=aserver.mybreeze.
Setting up the SSL hardware accelerator You perform the following tasks on the SSL hardware accelerator: • Configure SSL Certificate A and B to send the unencrypted data to the Breeze IP address (Breeze Server) listening on port 443. In the preceding example, these are yourserver-ns.macromedia.com (Certificate A) and ps-breezewin4.macromedia.com (Certificate B). • Create SSL certificates for both Breeze Server and the Breeze Meeting servers.
5. Set up a fully-qualified client-visible Domain Name Service (DNS) name (the direct name) that routes traffic directly to Breeze Server. ■ The direct name for each Breeze Server in the cluster should route traffic to ports 80, 443, and 1935 to the corresponding Breeze Server. For more information, see “DNS configuration guidelines” on page 59. 6. Set up a load balancer on the network and configure it to listen on port 80.
3. Stop Breeze Server on Computer2. Select Start > Programs > Macromedia > Macromedia Breeze 5 > Stop Breeze Server. 4. Log in to the Breeze Manager. You can log in to the Breeze Manager from the following URL: http://admin_host/servlet/admin where admin_host is the host name you entered as the value of the ADMIN_HOST variable in the Breeze Server custom.ini configuration file. When you log in, the Breeze Manager home page opens. 5. Start Breeze Server on Computer2. 6. Stop Breeze Server on Computer1. 7.
4. Upload a JPEG image or other content to Breeze Server on Computer1: a Make sure that you are a member of the Account Authors user group. To upload content, even if you are an account administrator, you must also be a member of the Account Authors user group. As an account administrator, you can add yourself to the Account Authors group. For information on how to do this, select Breeze Manager Help > Contents > Managing Users and Groups > Managing Groups > Adding members to a group.
Changing the Breeze password The password for Breeze Server allows access to the Breeze database. For the integrity of your system security, change the default password if you’re using the Breeze database. Note: Microsoft SQL Server 2000 users usually already have a password that the database administrator has set. To change the database password: 1. Open the command prompt window on the computer that is hosting the database. 2. Log in to the Breeze database, osql -U sa -P breeze -d breeze 3.
• Establish a system for overwriting backups, reusing the oldest backups first. • Use expiration dates on backups to prevent premature overwriting. • Label backup media to prevent overwriting critical backups. This allows for easy identification of the data stored on the backup media or the specific backup set.
Backing up your Breeze files You should create backups of the Breeze configuration files and the Breeze content folder: • Back up the custom.ini found in the breeze directory • Back up the two config.ini files found in: ■ c:\breeze\appserv\conf ■ c:\breeze\comserv\conf • Back up the content folder in the following location: [Boot drive]\Breeze\content. To back up your Breeze files: 1. Stop all Breeze services. In Windows, select Start > Programs > Macromedia Breeze > Stop Breeze Server. 2.
CHAPTER 5 Verifying Your Installation After you install and configure Macromedia Breeze, verify that the installation was successful and that all features are functional. To verify a successful Breeze installation: 1. Verify that the Breeze database and Breeze Server work together (see “Verifying that the Breeze database and Breeze Server work together” on page 92). 2.
Verifying that the Breeze database and Breeze Server work together If you can log in to Breeze Manager (a web application within Breeze Server), the Breeze database and Breeze Server can function together. To verify that the Breeze database and Breeze Server work together: 1. Go to the following URL: http://hostname/common/help/en/support/startmain.htm. Note: In this URL, hostname is the value you set for the ADMIN_HOST variable in the custom.ini configuration file.
3. Click New User. The New User Information page appears and requires the following information: ■ First Name ■ Last Name ■ E-mail ■ Login (the new user’s e-mail address is usually his login name) ■ Password (must be between 4 and 16 characters) 4. Enter the required information using the new user’s e-mail address in the E-mail text box, and make sure that the E-mail the New User Account Information, Login and Password option is selected. 5. Click Next to continue. 6.
In addition to the "Getting Started" guide, we recommend you visit the following resources to learn more about using Macromedia Breeze: Macromedia Breeze Resource Center (tutorials, best practices, and other resources): http://www.macromedia.com/resources/breeze/ Macromedia Breeze Support Center (self-service and assisted support options): http://www.macromedia.com/go/breeze_contact_support_en Macromedia Breeze Developer Center (technical resources): http://www.macromedia.
7. When the compilation is complete, go to the Content tab in Breeze Manager and search for your presentation. 8. Open your presentation to view it. Verifying that you can use Breeze Training To verify that Breeze Training is functional, go to the Training tab in Breeze Manager. If the Training tab is visible and accessible, Breeze Training is functioning. Make sure that you are enrolled in the Training Managers group.
Verifying that you can use the Breeze seminar feature To verify that the Breeze seminar feature is functional, you create a Breeze seminar in Breeze Manager and then enter (log in to) the seminar room. Make sure that you are enrolled in the Seminar Hosts group. To verify that the Breeze seminar feature is installed and functioning successfully: 1. In Breeze Manager, click the Seminar Rooms tab and select New Seminars.
INDEX A accelerator hardware setup for SSL 84 Adaptor.
Directory Service Integration 62–77 configuring 62–71 connection settings 63 define the deletion policies 76 define the password policies 75 defining synchronization actions 70 events in synchronization log file 74 log file format 73 mapping Breeze group profile 68 mapping Breeze user profile 65 planning 13 schedule synchronization 70 user authentication 77 viewing synchronization log files 72 DNS configuration 59 configuration in cluster 85 Documentation for Breeze 6 Domain Name Service See DNS F failover
backing up Breeze files 90 backing up the Breeze database 88 backups 88 best practices 21 Breeze Server 17 changing password 88 database server 17 infrastructure 16 network 16 planning 15 resources and references 22 single-server Breeze 18 system 20 security considerations 15 Server.
Index