
User Guide


Creating a new user manually 283
3.
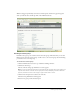
Click the New User button at the bottom of the list.
The New User Information wizard appears.
4.
(Required) Enter the new user’s last name, first name, and e-mail address; (optional) enter any
other profile information.
5.
Type a new password to mail to this user in the New Password text box, and then retype it for
confirmation; if the user has an e-mail address, leave the E-mail the New User Account
Information, Login and Password box selected. If they do not have e-mail, deselect it.
6.
(Optional) Enter any audio conference settings in the appropriate text boxes.
7.
Do either of the following, as appropriate:
■ To end the wizard without assigning this user to any groups, click Finish.
The User Information page for this user appears; if you decide to assign the user to a group
at this point, click the View Group Members button and proceed to step 6
■ To assign this user to one or more groups, click Next.
The Edit Group Membership page appears with the Possible Groups list on the left and the
Current Group Membership list on the right.
8.
In the Possible Groups list, select the each group to which you want to assign to this user as
follows:
■ To add this group without adding members, click Finish.
The User Information page appears; proceed to step 9
■ To add members, click Next.
The Edit Group Membership page appears with the Possible Groups list on the left and the
Current Group Membership list on the right. Proceed to step 10
9.
Do either of the following:
■ To send a link to the user so that they can reset their password, click the “Send a link to reset
this user’s password” link in the Password field.
A message appears informing you that the e-mail was sent. Click OK to return to the User
Information page.
■ To set a temporary password for this user that you can provide directly (for example, by
telephone), click the Set a Temporary Password for this user.
The temporary password page appears with a system-generated password for this user. Click
Save to return to the User Information page.
10.
In the Possible Groups list, select each group to which you want to assign this user, as follows:
■ To select multiple groups, press Control-click or Shift-click, as appropriate.
■ To expand a group so you can select individual names, double-click the group name; when
you are done, double-click Up One Level in the list to return to the original list.
■ To search for a name in the list, click Search at the bottom of the window and enter the
name to display it in the list, and then select it.