
User guide

14
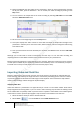
Engaging learners through interactive presentations: Using Adobe Presenter (Breeze)
Educational Technology Team
email: edtech@groups.nus.edu.sg
Centre for Development of Teaching and Learning
Adding narrations to the PowerPoint presentation
1. Put your Headsets on and adjust for a comfortable fit.
2. Positioning your microphone correctly is important. The microphone should
be 1-2 inches from the corner of your mouth. With your presentation open in
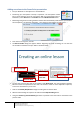
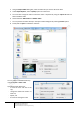
PowerPoint, select Record from the Audio tab of the Adobe Presenter menu.
3. Before beginning audio recording, Adobe Presenter will automatically check that the input level for
the microphone is set. Read the statement, “I am setting my microphone recording level….”
4. Once the icon turns green, click OK.
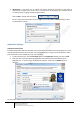
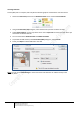
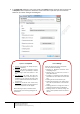
5. The Record Audio dialog box appears. Before beginning the audio recording, be sure that the
correct slide in PowerPoint is open. Slide 1 should be visible.
6. To show the script for each slide in the window. Click Show Script. The notes dialog box appears.
All lecture notes are imported for each slide. This makes it easier to record. Adjust the script size,
so that it is convenient for you to read.
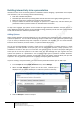
7. Click on the Record (Red) button to begin recording. Record the first slide.
8. When finished reading the script for this slide click the Stop Recording button.
9. Using the forward (<) and backward (>) buttons to proceed to the next slide or move back to the
previous slide.
Record narration
Show script
Display bigger text
Move to the
next slide
Save narration