
User guide

11
Engaging learners through interactive presentations: Using Adobe Presenter (Breeze)
Educational Technology Team
email: edtech@groups.nus.edu.sg
Centre for Development of Teaching and Learning
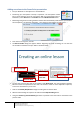
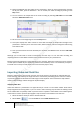
4. Attachments – This allows you to upload any include documents and links to web pages as
attachments to support your content. This is a handy tool if you would like your students to refer
to reading as they are going through the presentation.
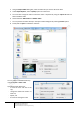
Click on Add to include new documents
Key in a name for the attachment, from the Type, choose either File or Link depending on what
you would like to include.
Application Settings
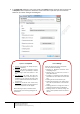
Adding Presenter Details
Presenter details will include the information of the instructor who delivers the e-learning lesson. You can
include information like the name, job title, short biographical notes, a logo, and contact details to make
your presentation more credible, personal, and interesting.
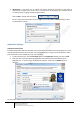
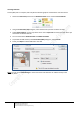
1. To add new presenters, choose Presenters tab from the Application settings, and click on Add.
2. Enter the name of the new presenter and other information like the email address, photo,
biography, etc. To set your name as the default presenter, make sure the Default option is
checked.
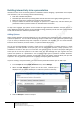
You can edit or delete a presenter at any time using the Edit and Delete buttons respectively.
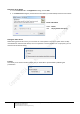
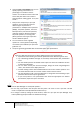
For the photos and the logos,
Adobe Presenter accepts only JPG or
PNG images.