Engaging learners through interactive presentations: Using Adobe Presenter (Breeze) Centre for Development of Teaching and Learning (CDTL) National University of Singapore email: edtech@groups.nus.edu.
TABLE OF CONTENTS DELIVERING ONLINE INSTRUCTION............................................................................................ 4 INTRODUCTION TO ADOBE PRESENTER ..................................................................................... 6 How it benefits the instructors and students ..................................................................................6 Recommendations before starting .........................................................................................
Synopsis Online teaching is becoming increasingly common at most higher education institutions. Online instruction methods range from hybrid courses that offer a combination of face-to-face and online instruction, to fully online experiences and distance learning. However, many educators still resist offering such courses due to the fear that developing rich e-learning content requires a lot of time and specialized skills—not just to produce but also to modify and maintain.
Delivering online instruction The Internet and multimedia technologies are reshaping the way knowledge is delivered, and e-learning is becoming a real alternative to traditional classroom learning. Online teaching is increasingly common at many types of higher education institutions, ranging from hybrid courses that offer a combination of inperson and online instruction, to fully online experiences and distance learning.
Here are some guidelines when you have decided to deliver an e-learning course: • Know your audience It is important to identify your audience and to be sensitive to the needs and interests of your audience. Define prerequisites for your course, and if you have the tools and time, verify that those tasks have been completed by your students. • Deliver organised content Make sure the content you plan to deliver is relevant, organised, clear, and to the point.
Introduction to Adobe Presenter When you start developing an online lesson, one of the main factors that you should consider is the media you would use to deliver the instruction. Two common e-Learning delivery media are: asynchronous webbased courses and synchronous virtual sessions. Adobe Presenter is a plug-in that integrates with Microsoft PowerPoint and simplifies the creation and sharing of narrated, self-paced, media-rich presentations.
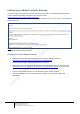
Setting up an Adobe Presenter Account In order to begin using Adobe Presenter, you will need to contact the current Adobe Presenter (Breeze) account administrator at NUS and register your name and userID: http://www.cit.nus.edu.sg/breeze-diy-courseware/ The Adobe Presenter (Breeze) account administrator will activate your account and an email notification will be sent to you.
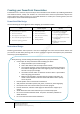
Creating your PowerPoint Presentation Presentations are a common way for faculty to share information with students. By combining PowerPoint with Adobe Presenter, faculty and students can now extend their classroom presentations beyond the physical classroom. Before moving on to use Adobe Presenter to create your e-learning lessons, the first step will be to create a PowerPoint presentation. PowerPoint Slide Design Use the following tips and suggestions when designing your PowerPoint slides.
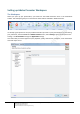
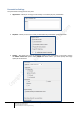
Setting up Adobe Presenter Workspace The Workspace When you open up your presentation, you should see the Adobe Presenter menu in the PowerPoint toolbar. This workspace gives you an overview of all the features available in Adobe Presenter. It is always a good practice to set your preferences before you work on your presentations. To start setting your preference, from the Tools tab of Adobe Presenter menu, select Settings.
Presentation Settings The presentation setting consists of 4 parts: 1. Appearance – allows you to assign a Title and key in a summary of your presentation 2. Playback – allows you to set up on how you would like the presentation to be played back. 3. Quality – This allows you to set the publishing quality of the presentation on the server. Choose the Adobe Connect Pro option under Publish For.
4. Attachments – This allows you to upload any include documents and links to web pages as attachments to support your content. This is a handy tool if you would like your students to refer to reading as they are going through the presentation. Click on Add to include new documents Key in a name for the attachment, from the Type, choose either File or Link depending on what you would like to include.
Setting the Server Details 1. From the Servers tab in the Application settings, click on Add. 2. In the Add server dialog box, add the Server information (as shown below) and click ok to confirm. Server information Name: Breeze URL: https://breeze.nus.edu.sg Setting the Audio Source While setting up the audio source, you can either use a microphone or the line-in option that is usually included with an external audio device, such as a tape deck or stereo amplifier.
Narrating your presentation It is recommended that you create a script for audio. Before beginning, practice reading the script aloud. A guideline might be one minute or less per slide. Use the following tips and suggestions when adding narrations to your Adobe Presentation: • Prepare a written audio script before recording your narration. o Use the Script Import feature when recording your narration to import speaker notes into the Record Audio dialog box.
Adding narrations to the PowerPoint presentation 1. Put your Headsets on and adjust for a comfortable fit. 2. Positioning your microphone correctly is important. The microphone should be 1-2 inches from the corner of your mouth. With your presentation open in PowerPoint, select Record from the Audio tab of the Adobe Presenter menu. 3. Before beginning audio recording, Adobe Presenter will automatically check that the input level for the microphone is set.
10. Repeat steps 8-9 for the other slides of your presentation. Once you have completed the recording for all your slides, press the OK button. You can review your audio recordings by clicking on the Play button. 11. You can review or do simple edits of the audio recording by selecting Edit Audio from the Audio tab of the Adobe Presenter menu. 12. Set the cursor to the beginning and click the Play button. 13.
3. Using the Import Video dialog box, select the video file you want to add to the slide. 4. Under Import Options, select a Quality option from the menu. 5. You could also change the slide on which the video is imported by using the Import On menu to select a different slide. 6. Choose between Slide Video and Sidebar Video. 7. You can preview the video directly in the Import Video dialog box by selecting Preview option. 8. Finally click on Open to embed the video file.
Inserting Flash files A Flash (SWF) file is a compiled, view-only file that delivers graphics and animation over the Internet. 1. Choose the Insert Swf option from the Adobe Presenter menu and select Insert Swf File. 2. Using the Insert Flash (swf) dialog box, select the flash file you want to add to the slide. 3. Under Import Options, use the drop-down menu next to Import On to choose the slide where you would want to add the flash file. 4. You can choose either Slide animation or Sidebar animation. 5.
Building interactivity into a presentation Interactions need to be consciously planed in PowerPoint. When designing a presentation that requires user interaction, such as a learning scenario with branching: • Start with a detailed storyboard. • Stimulate open discussion by inserting slides that ask rhetorical or thought-provoking questions. • Make use of discussion questions to introduce new information.
4. In the New Quiz dialog box, enter a new name in the Name text box. From the pop-up menu next to Required, select an option to determine if users must take or pass the quiz. You could also finalise on your other setting at this dialog box. Options for Required Other Settings 1. Optional. The learner can attempt the quiz, but is not mandatory. 2. Required. The learner is required to at least attempt the quiz. A quiz attempt is defined as answering at least one question in the quiz. 3. Pass Required.
6. Using the Pass or Fail Options tab, you can specify a passing score either as a percentage or a number of correct answers. You could also set the action that has to take place when users receive a passing grade or a failing grade. Then, click on OK. 7. Now you are ready to key in your quiz questions.
Designing your presentations An easy way to design how your presentations appear is by the use of themes that is bundled with Adobe Presenter. Themes allow you to add static images, colors, and sound to create dynamic and interactive presentations. The same theme can be re-used for all the presentations that you create or you can design your own customised new themes for each new presentation.
5. One of the first things you might like to do is save one of the themes as your own theme template using the Save as… option, which you can then customise and re-use. 6. On the right hand side of the theme editor window, there are various options that you can switch on or off using the three sections available: • Customize: To set the type of display(e.g., full-screen) • Presenter Info: Helps you decide on whether to display a photo, contact, Bio, etc.
Publishing your presentation Publishing a presentation to the Adobe Presenter server will enable you to view your presentation online. But it is always a good idea to preview your presentation before publishing to the server. 1. To preview, select Preview from the Presentation tab of the Adobe Presenter menu. 2. To publish, select Publish from the Presentation tab of the Adobe Presenter menu. 3. You can choose to publish locally to a folder on your computer (either as a CD package or a .
Distributing your presentation Once your presentation has been uploaded to the Breeze server, you can view your presentation using the https://breeze.nus.edu.sg. Choose Content and then select My Content. The content list will have the list of presentations that has been uploaded by you. To get the content information for the uploaded presentation, click on the name of the presentation. This will display the information related to the presentation.
You can choose the Reports section to view the average scores achieved by your students on the quizzes included in the presentations. Adobe Presenter presentation can be distributed in several ways through: • Email • IVLE • Course website • Module Blogs • CD-ROM Distribution through Email An easy way to distribute a presentation to an audience is by sending the web address (URL) of the presentation in an email message.
This can be done either through your course website (popularly known as the K drive) or using your module blogs. On your module page, you can create a link to each presentation. The URL can be got from URL for Viewing section of the content Information. For example, an URL would like the following: Distribution through IVLE You can use the Weblink option in the IVLE module to create a new weblink to each of your presentations.
Best practices when using Adobe Presenter Some recommendations to follow when creating e-learning presentations using Adobe Presenter: • Plan your content. When you start preparing your e-learning presentation, keep in mind your topic, goals, objectives, flow of material and your audience. Organise your ideas and key points, decide on the structure and content first, before adding colour, text, audio, video or other visual materials.
References Technical Guides CIT Breeze DIY Courseware gives you a brief introduction to the Adobe presenter available at NUS. o http://www.cit.nus.edu.sg/breeze-diy-courseware/ Adobe Presenter User Guide https://helpx.adobe.com/pdf/presenter_reference.pdf Adobe Presenter Resources: A quick start guide o http://www.adobe.com/resources/acrobatconnect/presenter/ Adobe Presenter Self-learning Tutorial o https://admin.adobe.acrobat.com/_a227210/getstartedpresenter/ Readings 1. Allan M Jones. (2003).